
Ever stared at Photoshop’s masking tools, unsure if you should use a layer mask or a clipping mask? Both seem to achieve similar results – hiding parts of an image. Hence, the debate of clipping mask vs layer mask is a common challenge for beginners.
Layer masks offer precise control. Imagine a black-and-white transparency sheet—black hides, white reveals, and gray creates fades. Clipping masks, on the other hand, are all about simplicity. They use the shape of a layer above to define the visible area below, like a cookie cutter. It’s fast but less flexible.
Intrigued by the specific situations where each mask shines? Keep reading to discover the ideal conditions for using layer masks and leveraging clipping masks in your next Photoshop project!
Clipping Mask Vs Layer Mask: The Key Differences
A clipping mask uses the layer’s shape to define what’s visible on the layer below. It’s fast for basic cut-outs and edits linked to the mask shape. Whereas, the layer mask uses grayscale to control what’s hidden and shown on a single layer. It offers more control for fading or revealing specific areas.
Here’s the primary difference between clipping and layer mask:
| Characteristics | Clipping Mask | Layer Mask |
| Function | Defines the visible area of a layer based on the shape of another layer | Controls the visibility of parts of a single layer |
| Layers Used | Multiple layers | Single Layer |
| Flexibility | Limited – the mask is defined by the shape of the clipped layer | Incredibly flexible, edit the mask independently |
| Creation Method | Uses a separate layer (shape, text, vector) as the mask | Painted on a grayscale mask |
| Layer Order | Relies on the order of layers | Independent of other layers |
| Shape Capability | Flexible | Limited |
What is a Layer Mask?
One of the most advanced photo editing tools in Photoshop is a layer mask. It lets you hide selective parts of an image in a nondestructive way without permanently deleting them.
They’re useful tools to change background color, remove objects, and create photo composites.
How to Create a Layer Mask in Photoshop
Creating a layer mask in Photoshop is a complex process. But we divide the whole process into four easy steps so that anyone can understand. Here’s how to do it:
Step 1: Open Your Image and Select the Layer
Launch Photoshop and open the image you want to edit.
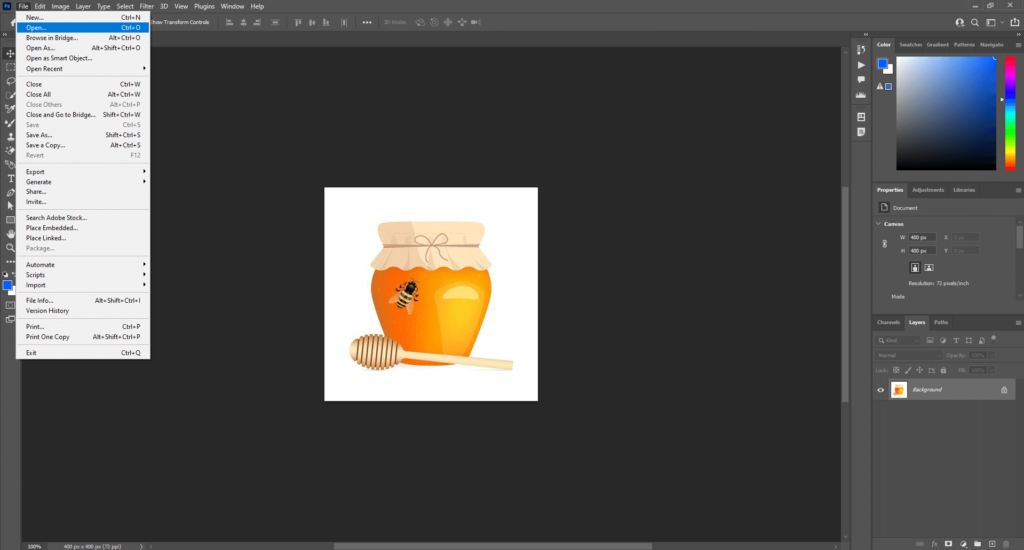
In the Layers panel (usually on the right), locate the layer you want to apply the mask to. Click on the layer thumbnail to select it.

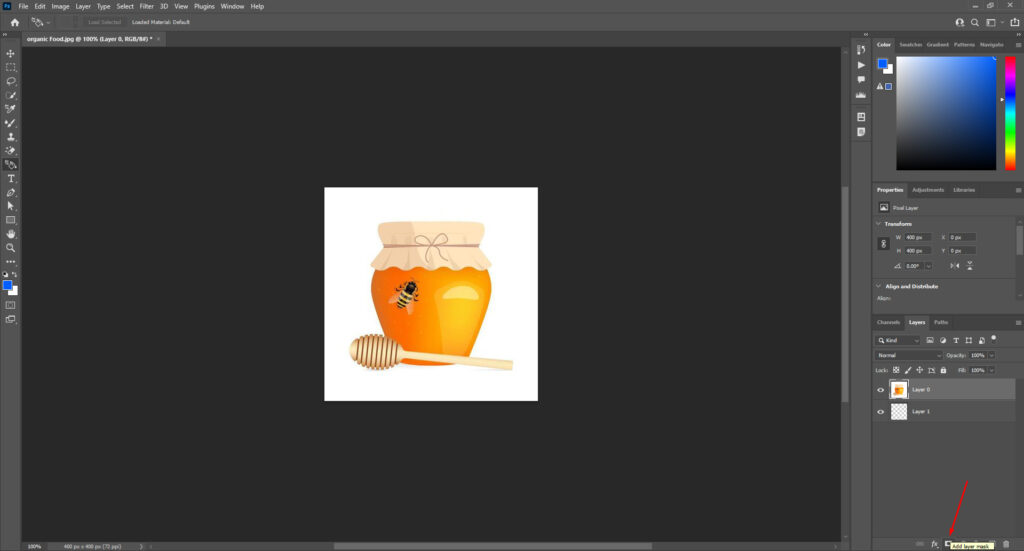
Step 2: Add the Layer Mask
Look at the bottom of the Layers panel. You’ll see a rectangular button with a square and a circle inside – that’s the “Add Layer Mask” button. Click the “Add Layer Mask” button.
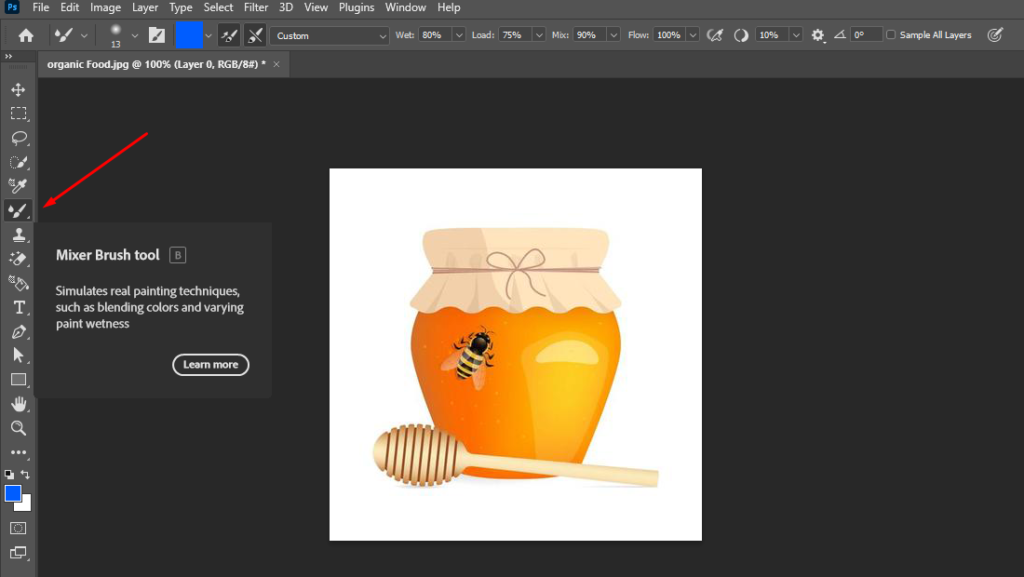
Step 3: Paint on The Mask to Hide or Reveal Areas
By default, the mask will be white, revealing everything on the layer. To hide parts of the layer, select the Brush tool.
Make sure your foreground color is set to black.
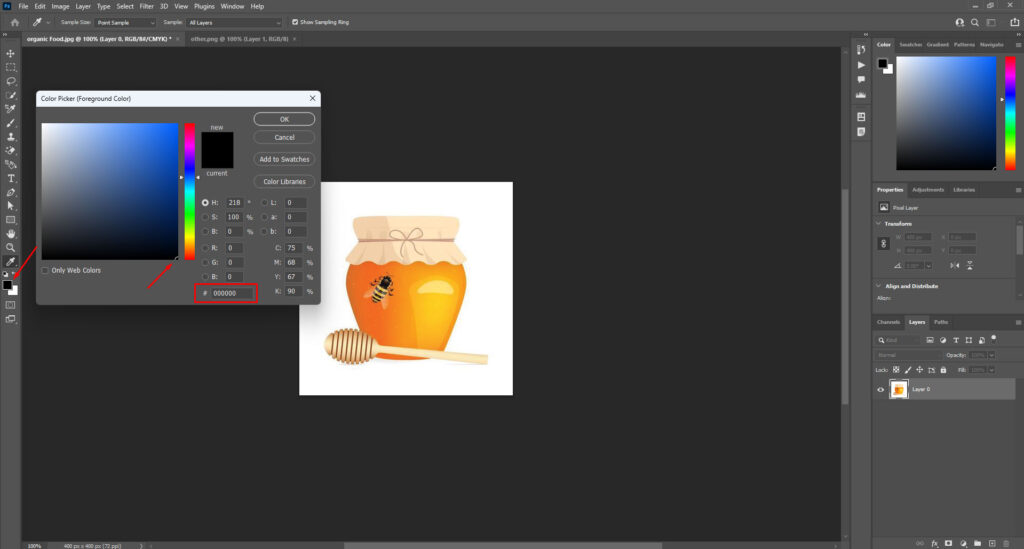
Paint on the mask thumbnail to hide those areas on the layer. Black areas on the mask hide the corresponding areas of the layer.
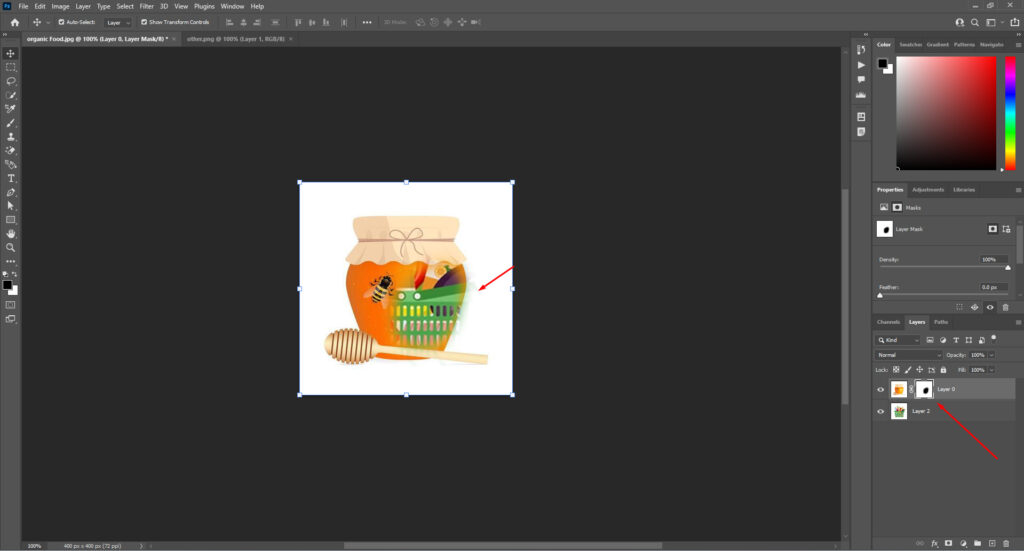
Use a white brush to reveal hidden areas by painting on the mask again. White areas on the mask reveal the corresponding areas of the layer.
Step 4: Refine the Mask
You can use various brush settings to achieve sharp or feathered edges on the mask. If you want to hide anything, paint the entire mask black. And paint with white to reveal any object.
How to Create a Layer Mask in Illustrator?
There are different ways to use Illustrator to create layer mask. Here is the most effective way to do it:
Step 1: Open Adobe Illustrator and upload the shape or image file.

Step 2: Make sure the image is on the top of the layer pattern. To do this, first select the image. Then right click on it. Next, choose Bring To Front from drop down menu.
Step 3: Press the Shift button and select both the image and the pattern. Now click on Object. Choose Clipping Mask and click on Make.
When Should You Use Layer Masks?
Though layer masking can be used across various design and editing tasks, here are some key areas where you should use layer masks:
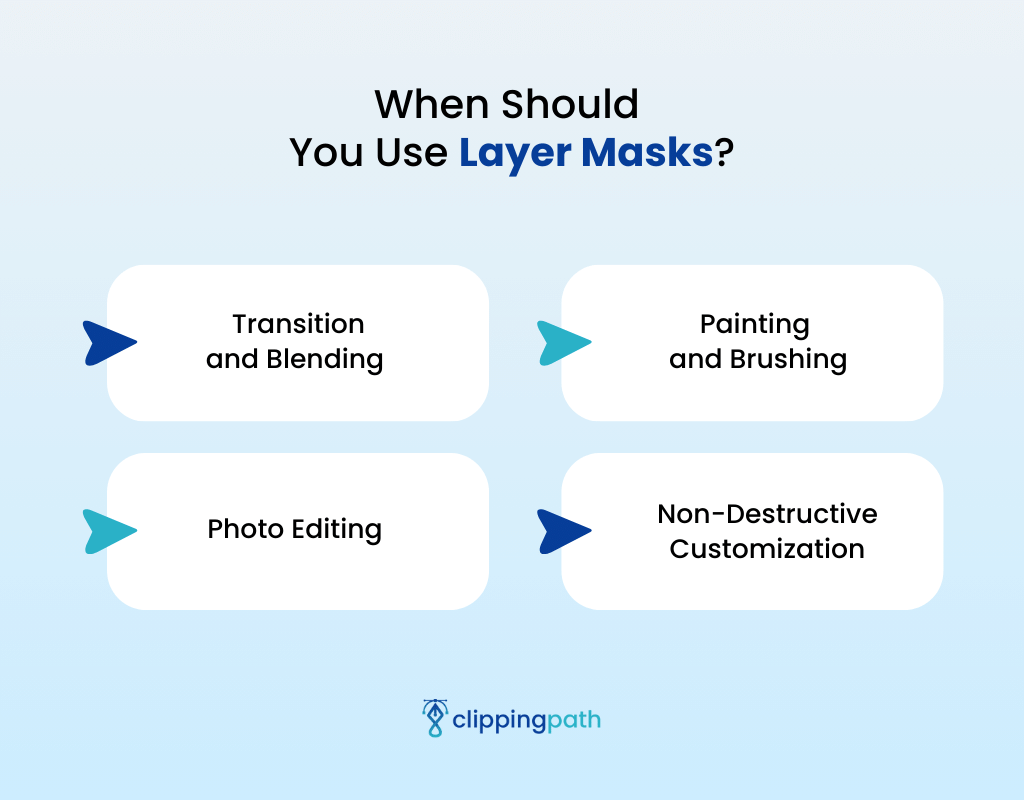
Transition and Blending
Layer masks allow you to create smooth transitions between layers. You can use them to add subtle shadows and reflections or integrate objects seamlessly into a scene.
Painting and Brushing
The layer mask technique is ideal for creating realistic textures like wood grain or fabric patterns when you need to apply gradients, patterns, and brush strokes.
Photo Editing
Layer masks are a go-to tool for photo editing in Photoshop. They allow you to edit specific areas of your image. You can adjust color contrast, exposure, or other properties without affecting the entire picture.
Non-Destructive Customization
You can use a layer mask to hide parts of a layer instead of erasing them permanently. This allows for flexibility and easy adjustments later without losing content.
What is Clipping Masking?
A clipping mask is a photo editing technique that controls the visibility of a layer. It’s like creating a hole in a piece of paper. That hole defines what shows through from the layer behind it. This is a handy tool for placing images inside shapes or text.
How to Create a Clipping Mask in Photoshop
There are different methods to create clipping masks in Photoshop, but we’ll show you the easiest one. Here’s how to create a clipping mask in Photoshop, explained with a picture:
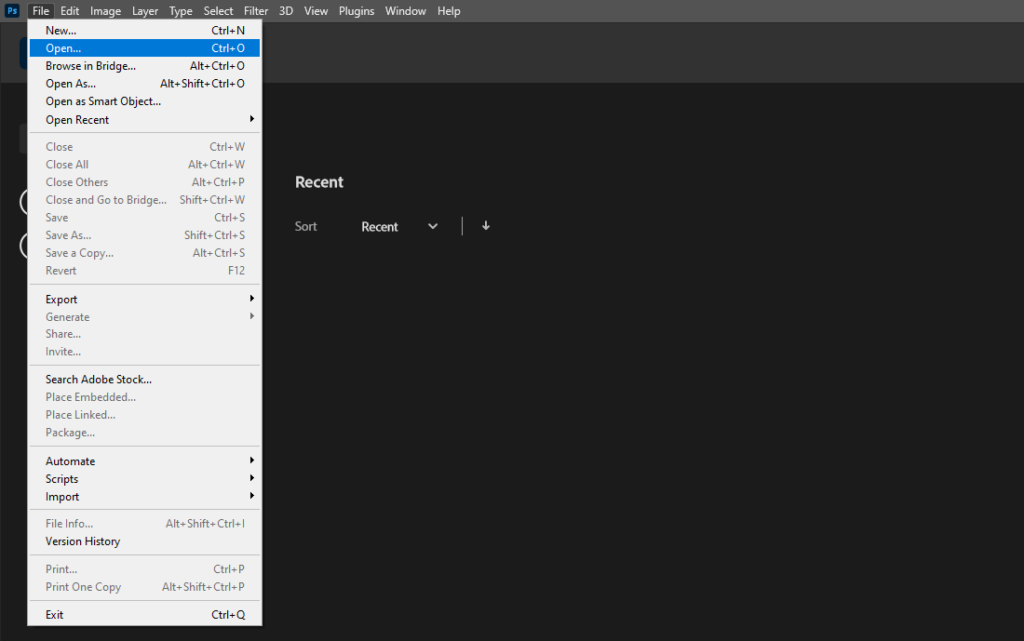
Step 1: Load the Image
Locate the File menu in the top left corner of the Photoshop workspace. Now click on Open or Pres Ctrl+O.
Step 2: Create a New Layer
In the Layers panel, click the icon with a plus sign (+) to add a new transparent layer.
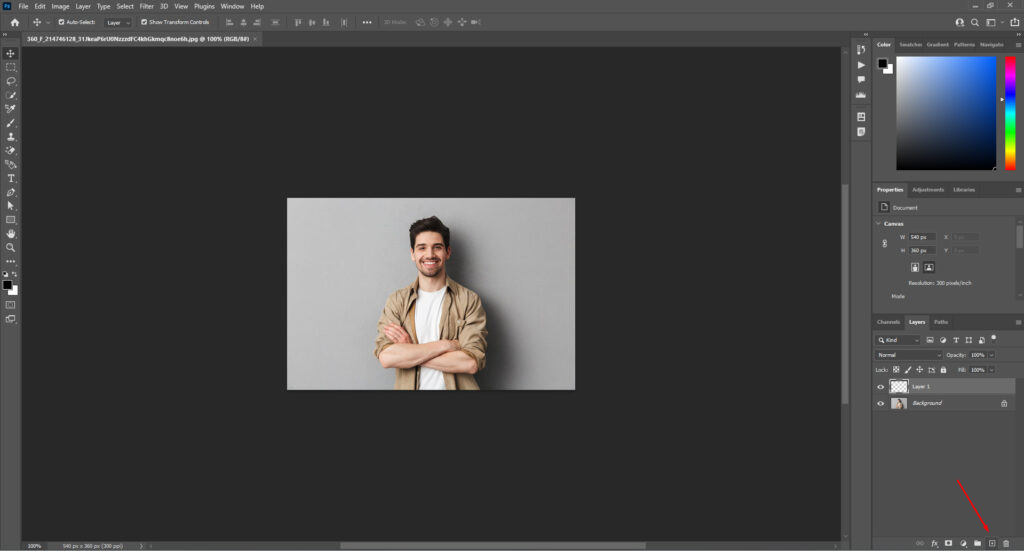
Now, arrange the layers. Drag and drop the new layer under the main layer.
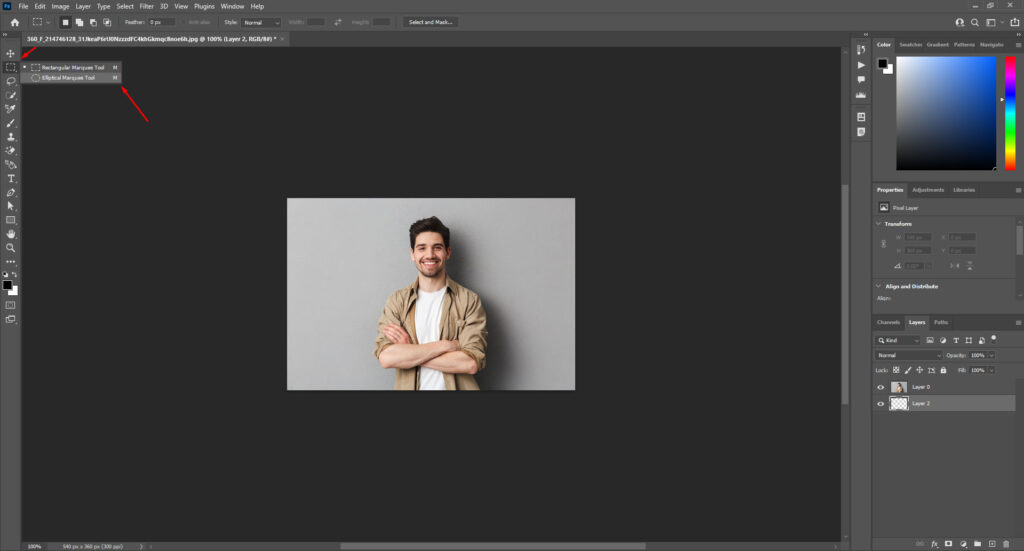
Step 3: Selecting the Marquee Tool
Locate the toolbar, usually on the left side of the Photoshop workspace. Look for the Marquee Tool. It’s typically the second icon from the top in the toolbar.
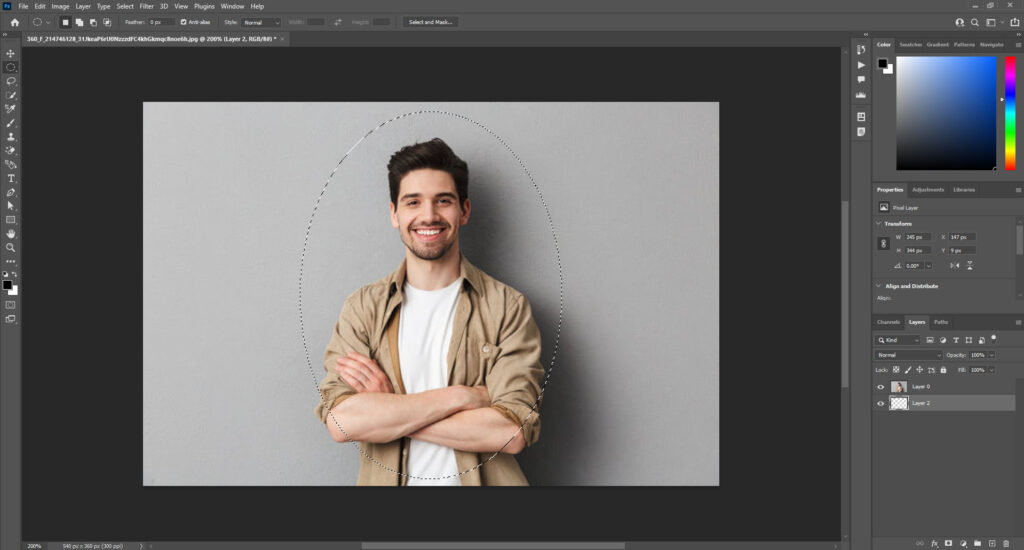
Step 4: Draw Your Mask Outline
Now mark the area you want to keep unchanged.
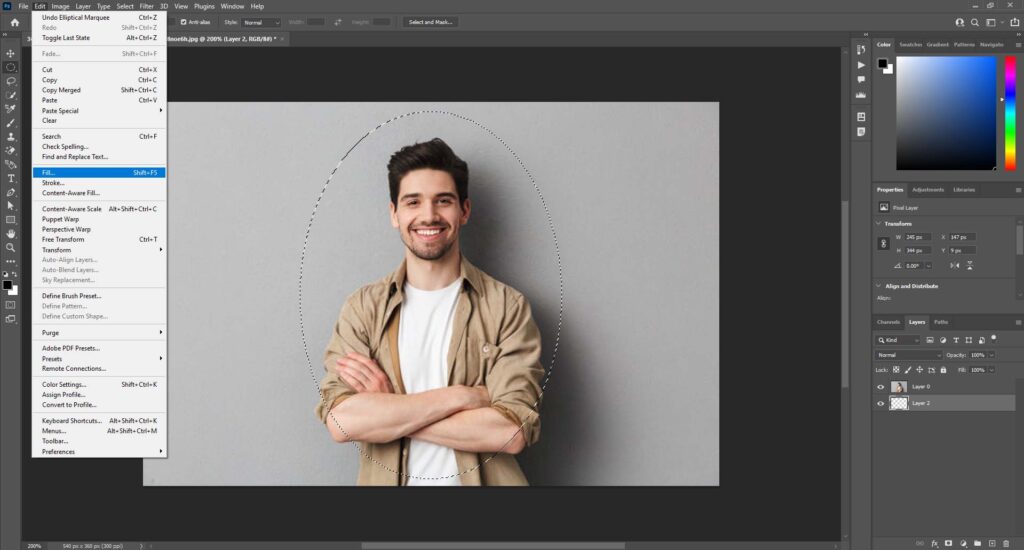
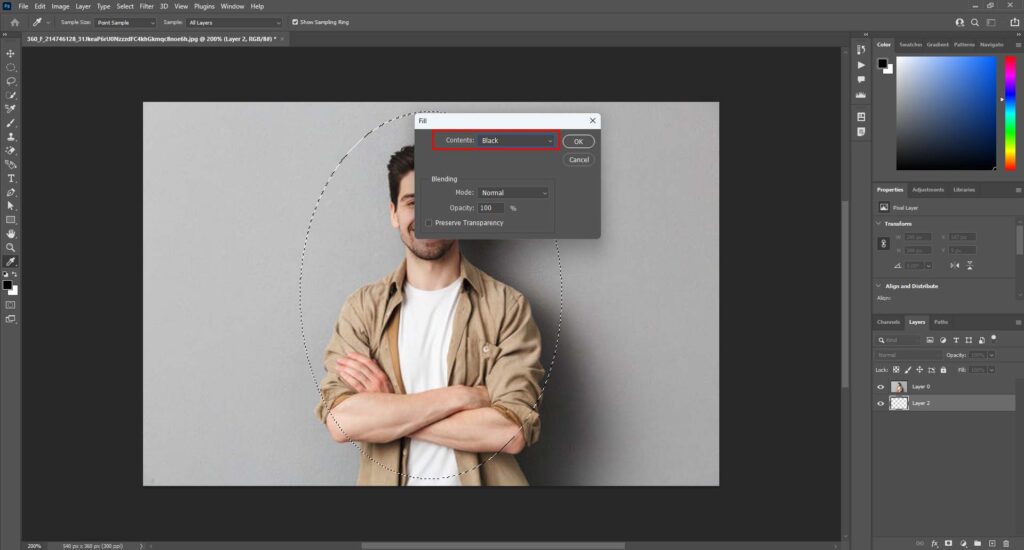
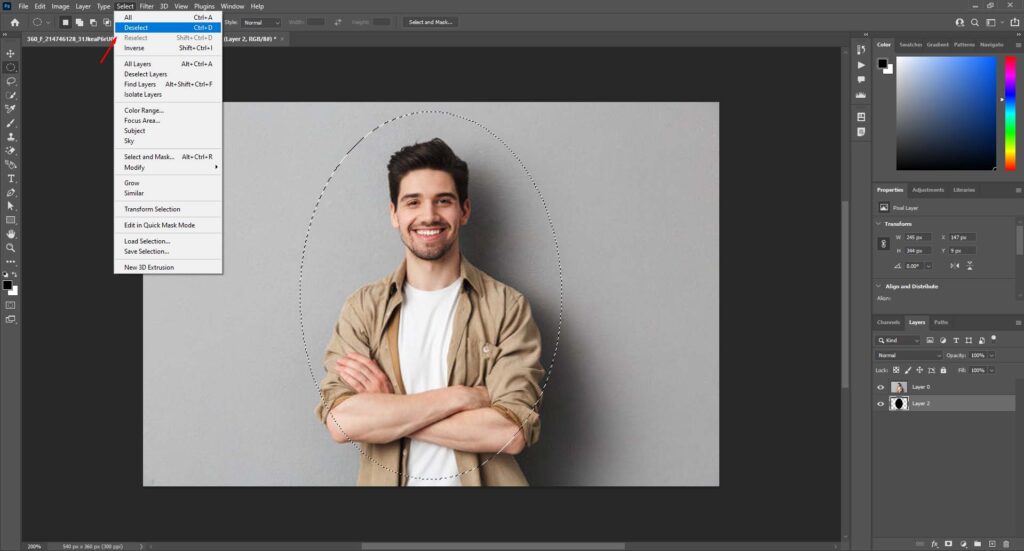
Now, click on the Edit menu and select Fill or press the keys Shift+F5. Then select the color Black and hit enter or select OK.
Now, once again, go to the menu bar and click on the Select option. From the drop-down menu, select Deselect.
Step 5: Clipping Mask
Start by making sure the top layer is selected.

Then, go to the “Layer” menu at the top and choose “Create Clipping Mask.” You can also press Alt+Ctrl+G.
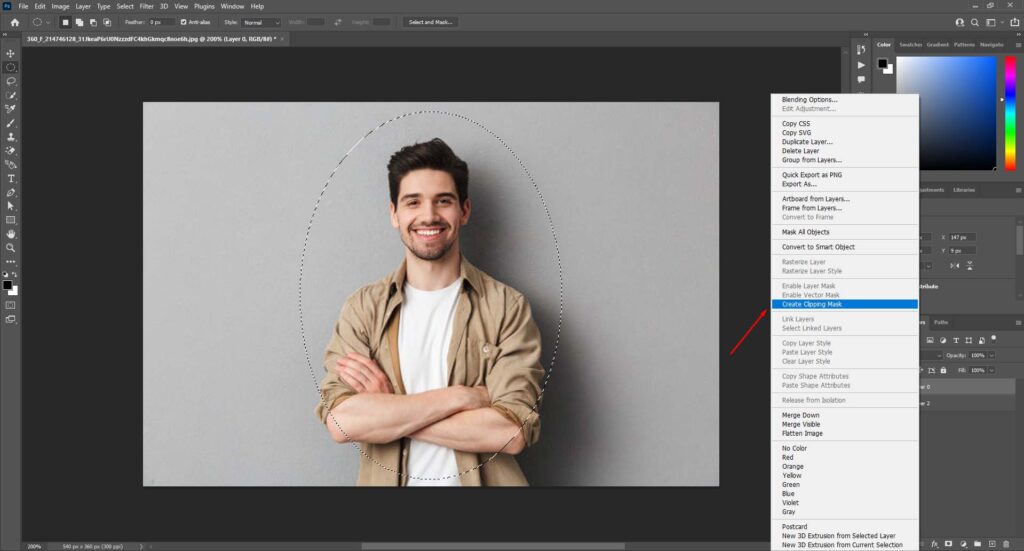
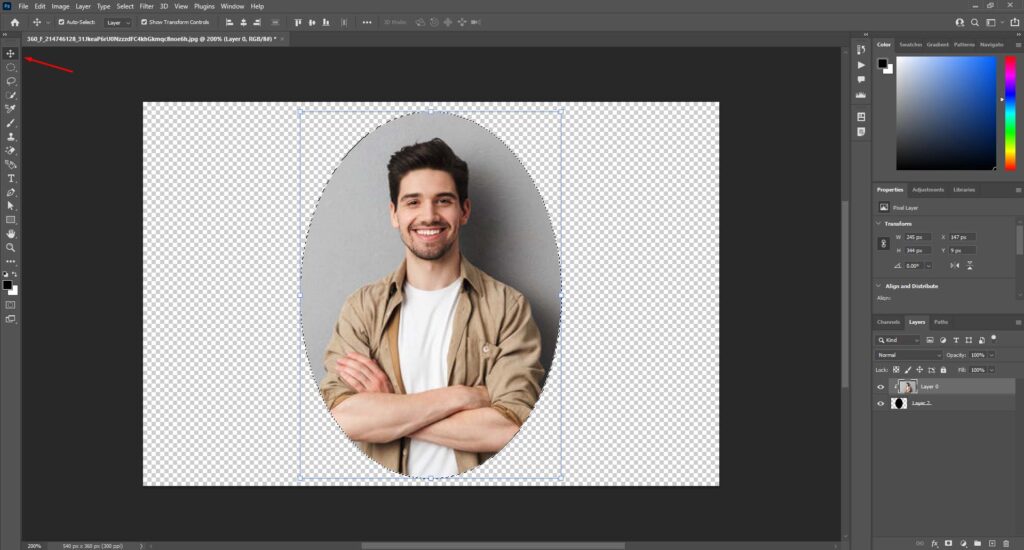
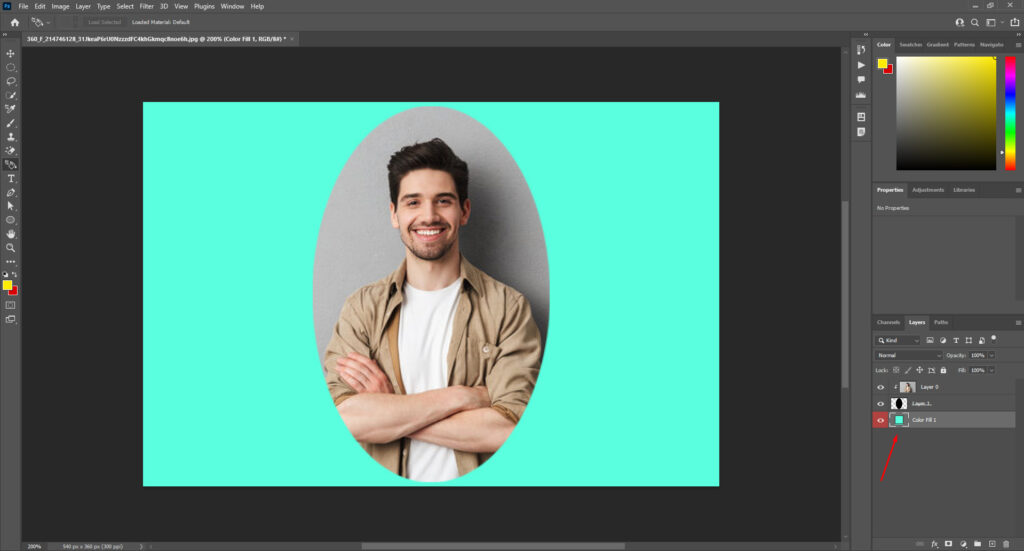
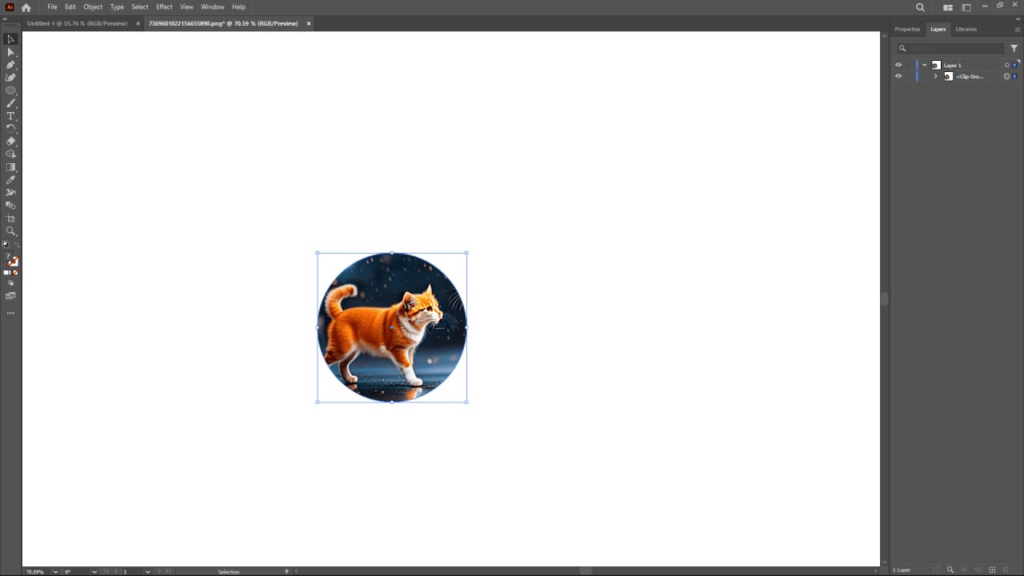
This is what you will see.

Now, position the image according to your preference. To do so, you need to select the Move Tool.
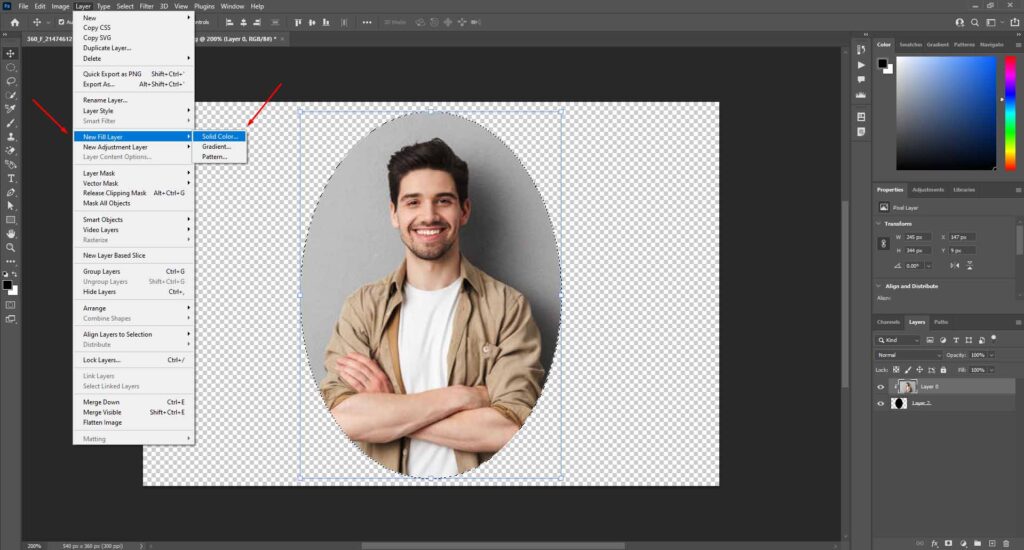
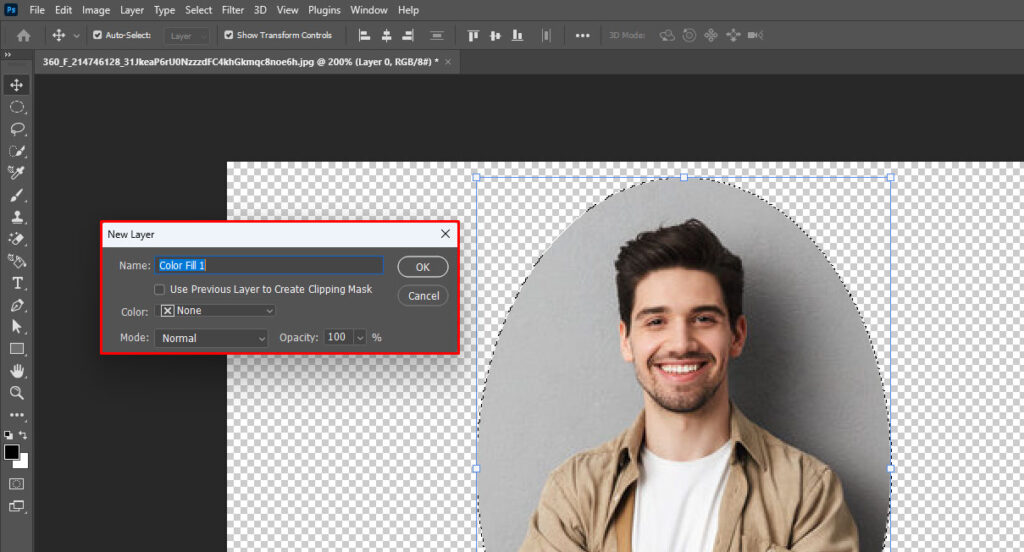
Step 6: Add a Background Color
To add a background color select New Fill Layer from the Layer Menu. Then chose solid color. Then, choose any color from the color box.
Step 7: Save the File
You can do this by going to File > Save As and choosing the PSD/PNG format to preserve your edits.
How to Create a Clipping Mask in Illustrator
You can easily create a clipping mask in Illustrator if you follow our steps:
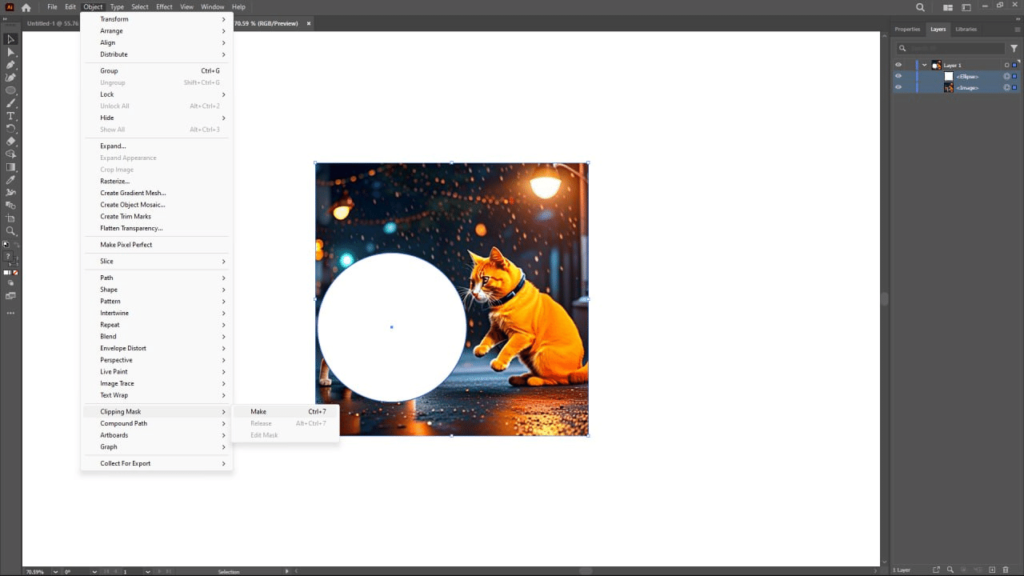
Step 1: First of all, you need to upload the image file to Illustrator.
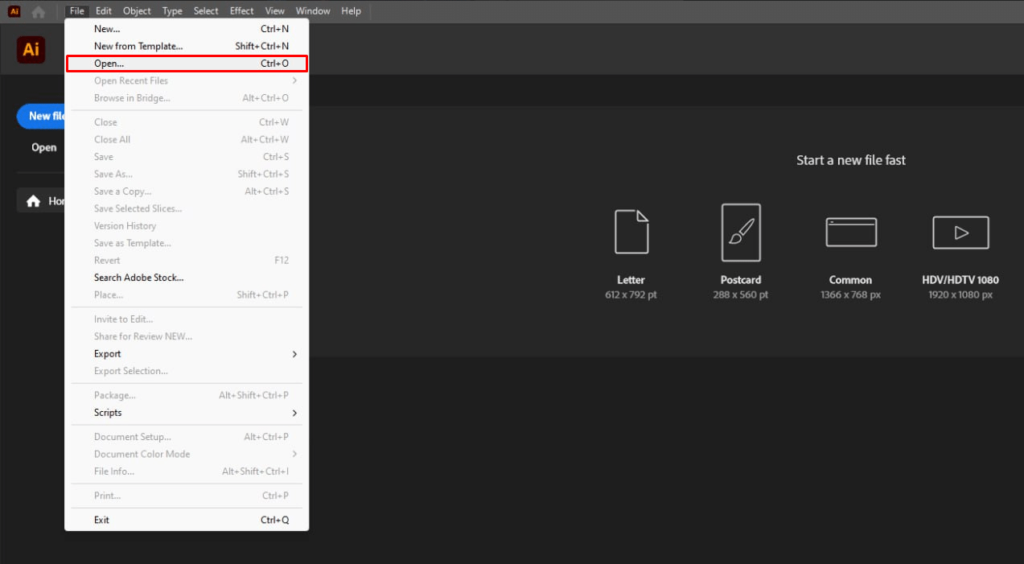
Step 2: Now, select the image and shape together. Next, go to Object, then select Clipping mask. Then select Make.
When Should You Use Clipping Masks?
Here are some common scenarios where clipping masks are particularly useful:
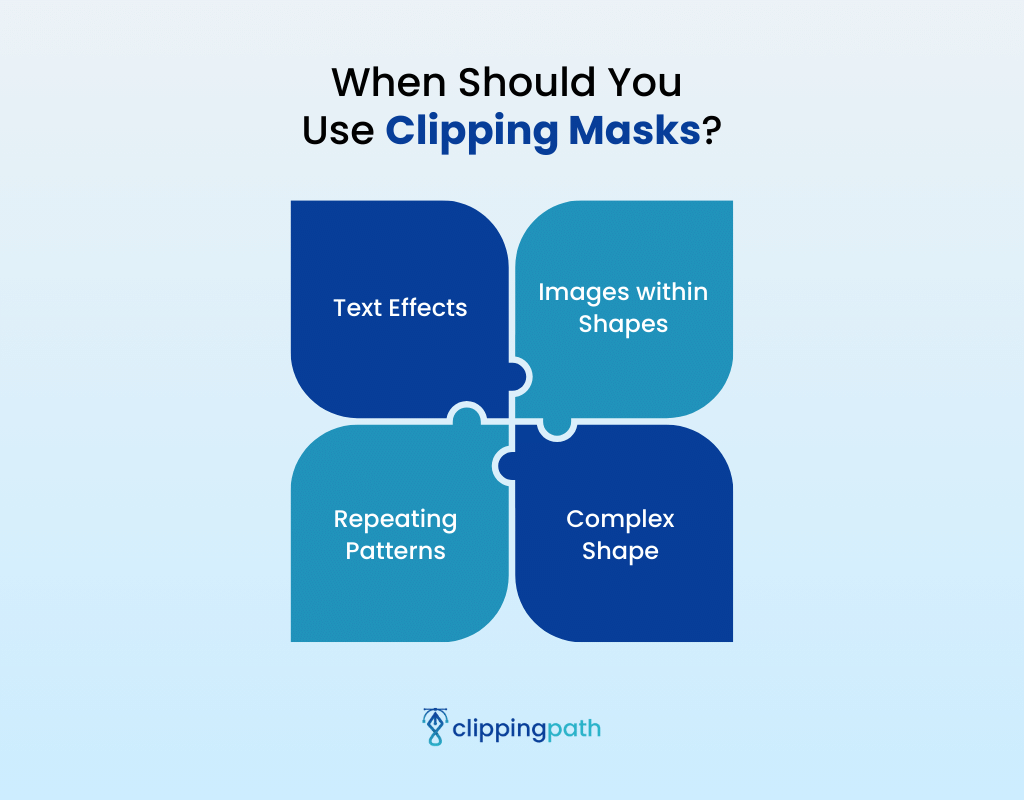
Text Effects
You can fill the text with an image or pattern. This is commonly used in advertising, poster design, and web design to make text more visually appealing.
Images within Shapes
Clipping masks allow you to insert images into particular shapes without cropping or resizing them manually. For example, you can place a photo inside the shape of a star, ensuring the image is confined to the star’s edges.
Complex Shape
When working with intricate designs, such as logos, icons, or detailed illustrations, you can use a clipping mask. It keeps intricate details within boundaries.
Repeating Patterns
The clipping mask is ideal for creating repeating patterns. This pattern could be a texture, a set of geometric shapes, or any repetitive design.
Conclusion
So, this the end of this clipping mask vs layer mask battle. Both offer non-destructive editing, allowing you to hide or reveal parts of an image.
Clipping masks are perfect for creating clean cut-outs based on the shape of another layer. Think of them like cookie cutters for your images – ideal for basic cut-outs and text effects.
Layer masks offer more precise control over visibility using grayscale. They excel at creating smooth transitions, selective edits, and revealing specific areas of an image. Need to blend a new object seamlessly into your scene? Layer masks are your friend!
So, which one to choose? It depends on your project’s needs. For simple cut-outs, clipping masks might be faster. But for more complex edits with smooth transitions, layer masks offer more control.
And if you want to get both services or either one of them, you can rely on Meta Clipping Path to get the best clipping service.
FAQs
How do I make a clipping mask into a layer mask?
To convert a clipping mask into a layer mask, press down the option key and click on the mask thumbnail in the Layers panel. This will deselect the clipping mask and let you edit the base layer. After you’ve done the editing, just copy-paste it as a new layer.
Which is easier to use, clipping masks or layer masks?
The layer mask is easier to use than a clipping mask. They offer precise control over single-layer images.
How do I remove a clipping mask from a layer?
To remove a clipping mask, select the clipped layer (hold Alt/Option while clicking). In the Layers panel, choose “Layer” > “Release Clipping Mask”.
What happens to an object when the clipping mask is released?
When you release a clipping mask, the object used for the mask becomes a regular layer again. It regains its original fill and stroke properties, and you can edit it independently.
Meta Clipping Path – A well-known one-stop photo editing service provider company with 5+ years of experience and 25+ highly skilled professionals.
Working with 20 reputed worldwide e-commerce companies and 200+ satisfied customers.
![Read more about the article How Do Clipping Masks Work? [Step-by-Step Guide]](https://metaclippingpath.com/wp-content/uploads/2024/05/How-Do-Clipping-Masks-Work-300x160.png)
![Read more about the article What is Masking in Photoshop? [A Comprehensive Guide]](https://metaclippingpath.com/wp-content/uploads/2024/08/What-is-Masking-in-Photoshop-300x160.png)
![Read more about the article What is a Clipping Mask in Illustrator? [Type, How to Create, and More]](https://metaclippingpath.com/wp-content/uploads/2024/06/What-is-a-Clipping-Mask-in-Illustrator-300x160.png)