![You are currently viewing Illustrator Clipping Mask Not Working [Possible Reasons and Fixings]](https://metaclippingpath.com/wp-content/uploads/2024/06/Illustrator-Clipping-Mask-Not-Working.png)
Trying to make a clipping mask in Illustrator, but it’s not working accurately. We know your frustration! Often, novice editors face the problem of Illustrator clipping mask not working due to several reasons.
The reasons can be —
- Not aligning the layers accordingly for clipping mask effects
- Using grouped objects instead of compound paths
- The layers are overlapping, which is ruining the masking effect
- Trying to mask texts directly instead of using shapes
But how do you solve these problems? Well, fixing these problems is pretty easy and takes only a minute or two. Interested in learning the solutions? Let’s dive into a more comprehensive discussion of the reasons and their quick solutions.
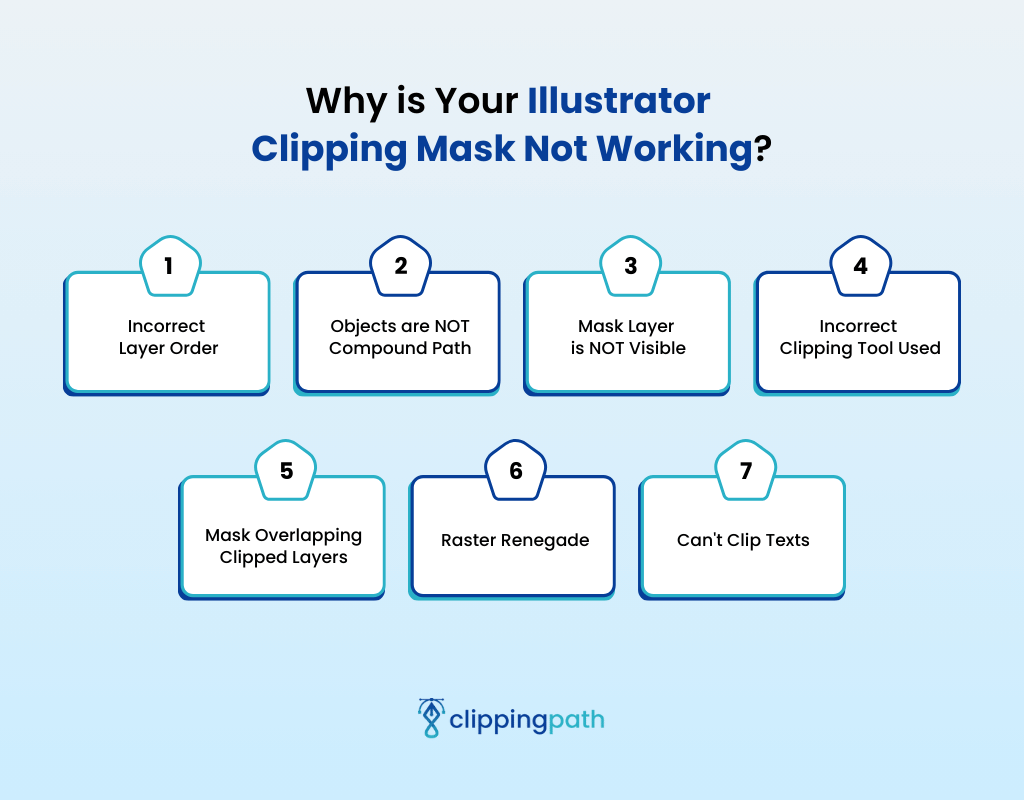
A Quick Chart of Illustrator Clipping Mask Not Working with Causes and Solutions
Take a quick look at all the causes and solutions before diving into the comprehensive discussion:
| Causes | Solutions |
| Incorrect layer order | Align the layer accordingly |
| Objects are not compound path | Ungroup objects and turn them into compound paths |
| Mask layer is not visible | Turn on the eye icon in the layer panel of the selected layer |
| Incorrect clipping tool used | Use the Clipping Mask for the task |
| Mask overlapping clipped areas | Apply the correct overlapping position |
| Raster renegade | Convert raster image into vector |
| Can’t clip texts | Turn the texts into outlines |
Why is Your Illustrator Clipping Mask Not Working?
If you’re a beginner in graphic design, you’ll encounter the issue of clipping masks not working in Photoshop and Illustrator. We’ll focus on discovering the reason behind this issue with clipping masks in Illustrator.
A clipping mask in Illustrator is a layer that masks or clips the layers beneath it, revealing only the parts of underlying layers inside the mask’s shape. There can be multiple reasons why the clipping mask may not work, for instance —
1. Incorrect Layer Order
When you work on Illustrator with the clipping mask, you need to ensure the layers are arranged in the correct order for masking. If the clipping mask layer is placed beneath the layer you want to clip with, the effect will not apply.
You need to make sure that the top layer contains the clipping shapes and the underneath layer is the vector for clipping to avoid an illustrator clipping mask grayed out.
How to Fix:
To arrange the layers accordingly, you can follow the below steps:
- Select the layers containing the clipping shape.
- Go to “Layer” from the top bar and click “Arrange” to check the layer order. The clipping shape layer should be above the layer being clipped.
- If the layer order is incorrect, choose “Bring to Front” from the menu to shift the clipping layer above the other.
2. Objects are NOT Compound Path
Another common mistake for which you may search for Illustrator clipping mask is not working Reddit is — not working on compound layer paths.
If clipping involves multiple shapes across separate layers, they must be combined together as a compound path first. Otherwise, Illustrator will randomly pick one of the shapes and mask the picture in one shape only.
You won’t be able to clip individual ungrouped shapes accurately. So, yes, you can’t make a clipping mask; the top selected object must be a path of the compound.
How to Fix:
The steps of making compound paths are straightforward. Here’s how to make a clipping mask in Illustrator with multiple shapes with compound paths:
- First, ungroup the objects if you have any.
- Then, select all the clipping shapes.
- Go to “Object” from the top options bar and select “Compound Path.” From the elaborated options, click on “Make” to create compound paths.
Note: You can select the clipping shapes and press “Ctrl/Cmd + 8” to make compound paths.
3. Mask Layer is NOT Visible
You may have noticed that the Illustrator clipping mask image disappears after clipping. What’s the reason? This may be because your masking layer is hidden on the artboard.
An “eye” icon in each layer in the Layer panel can make layers visible or hidden. When you want to apply a clipping mask on a layer, the layer must be visible on the screen.
How to Fix:
To fix this problem, you need to ensure the eye icon is activated. Sometimes, layers can be accidentally muted during edits. Simply click on the eye icon, and it will activate.
4. Incorrect Clipping Tool Used
Sometimes, the editors mistake the tool “Shape Builder” as a tool for clipping masks.
But this tool is basically used for deleting the edges of the selected shapes, not for clipping. The only suitable tool for clipping masks in Illustrator is the “Clipping Mask” tool.
How to Fix:
The simple solution is to use the right tool for clipping masks. Select the “Clipping Mask” tool from the Pathfinder panel.
5. Mask Overlapping Clipped Layers
If you want the clipping mask to work properly, there must be no gaps or spaces between the edge of the masking shape and the artwork.
Even minor mismatches along the overlay boundary can interfere with the application of the clipping effect.
That’s because the clipping mask relies on the top shape entirely on the content below to determine what areas should be visible in the shapes.
How to Fix:
You can solve this problem by applying the following steps:
- First, release the clipping mask that you have made. The release clipping mask illustrator shortcut is “Ctrl/Cmd + 7.”
- Then, arrange the overlay position correctly.
- Select the clipping shapes and make a clipping mask again.
6. Raster Renegade
In Illustrator Illustrator, clipping masks are based on vector paths or shapes. Raster images are made up of pixels, not mathematical anchor points.
Therefore, you need to work on vector paths to make clipping masks. The clipping mask effect won’t apply on raster images like PNG or JPEG.
How to Fix:
Follow the step-by-step process to convert your raster image into a vector in Illustrator:
- Open your raster image file in Illustrator.
- Select the raster image.
- Click on “Objects” and search for “Image Trace.”
- A dialog box will appear on your screen. Click on “Auto Color” from the option bar in the dialog box. After the image tracing process is complete, a background will appear behind the image.
- Click the “Expand” button in your left panel below to expand the trace into standard Illustrator vector paths. The traced objects will now be separate vector paths overlaid on the raster.
- If the paths are grouped, ungroup them and delete the background layer.
- Group the vector paths, bring the clipping shapes on top, and apply the clipping mask effect.
7. Can’t Clip Texts
Texts can’t make clipping mask; the selection must contain shapes in Illustrator. Like a raster image, you need to first convert the text into outlines or shapes for the clipping mask to work.
How to Fix:
Here is how to convert the text and fix this issue:
- Select the text and right-click on your mouse.
- From the dropdown options, select “Create Outlines.”
- Ungroup the text outlines and turn them into compound paths.
- Now, bring the text shapes above the vector image and apply the clipping mask.
Note: The font should be thick and heavy so that the alphabet has enough space to display the clipped image visibly.
Conclusion
Now, let’s summarize the possible reasons and quick fixes for the Illustrator clipping mask not working correctly.
You know that issues like incorrect layer orders, grouped objects, incorrect clipping tools, raster images, etc., cause a clipping mask not to work.
The editors usually forget to make compound layers, so you should check first whether you have grouped objects or compound paths.
If the problem still persists after you’ve tried each of these solutions, closing and reopening the file may solve the problem.
Meta Clipping Path – A well-known one-stop photo editing service provider company with 5+ years of experience and 25+ highly skilled professionals.
Working with 20 reputed worldwide e-commerce companies and 200+ satisfied customers.
![Read more about the article How to Invert a Clipping Mask for Beginners and Pros [Illustrator and Photoshop]](https://metaclippingpath.com/wp-content/uploads/2024/06/How-to-Invert-a-Clipping-Mask-300x160.png)
![Read more about the article Clipping Mask Not Working Photoshop [The Causes And Solutions]](https://metaclippingpath.com/wp-content/uploads/2024/06/Clipping-Mask-Not-Working-Photoshop-300x160.png)