![You are currently viewing How to Make Background White [A Complete Guide]](https://metaclippingpath.com/wp-content/uploads/2024/07/How-to-Make-Background-White.png)
Frustrated by that once-white background turning strangely gray on your website? E-commerce thrives on crisp, clean visuals, and that often means pure white backgrounds.
Here’s the good news: achieving a perfect white background for your product photos is totally doable, with three approaches:
- Shoot with a White Background: Plan ahead! Using a white background during the photography stage is the simplest solution.
- Edit in Photoshop or Illustrator: Powerful tools for precise control. We’ll delve into detailed editing techniques using these popular software programs.
- Online Background Changers: A quick and easy option, though it might lack the fine-tuning capabilities of dedicated software.
While Photoshop and Illustrator might seem intimidating at first, this guide will break down the editing process into clear steps, ensuring you get that perfect white background for your product photos. Let’s dive in!
How to Make a Background White in Photoshop
If you want to change photo background to white, you can follow the below step-by-step process in Adobe Photoshop:
Step 1: Select Magic Wand Tool
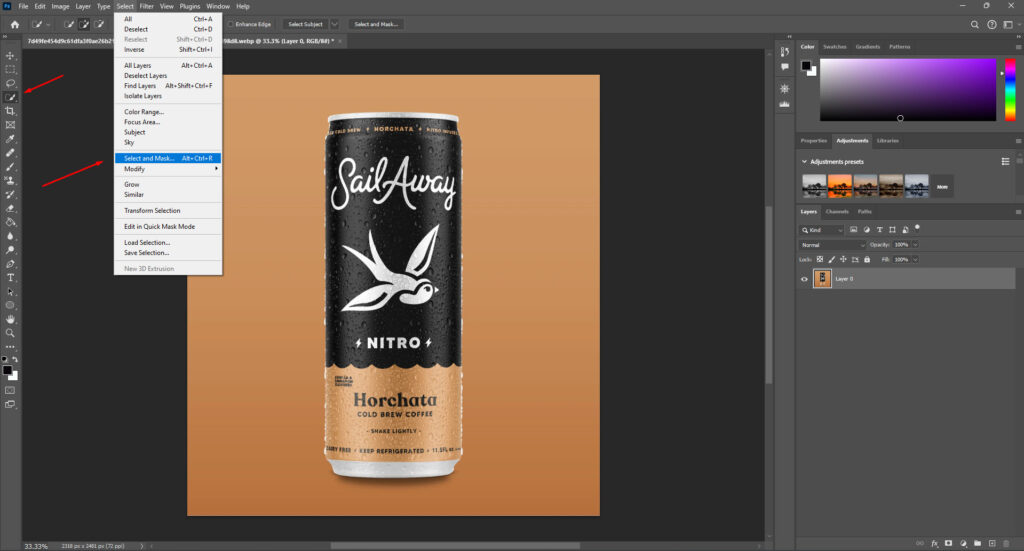
Open the image in a blank canvas and select the Magic Wand Tool. You will find this tool in the left side toolbar. After you select the tool, you will find “Select and Mask” in the above option bar.
Once you select the masking option, Photoshop will select the entire photo in red, including the subject and the background.
Step 2: Select the Subject
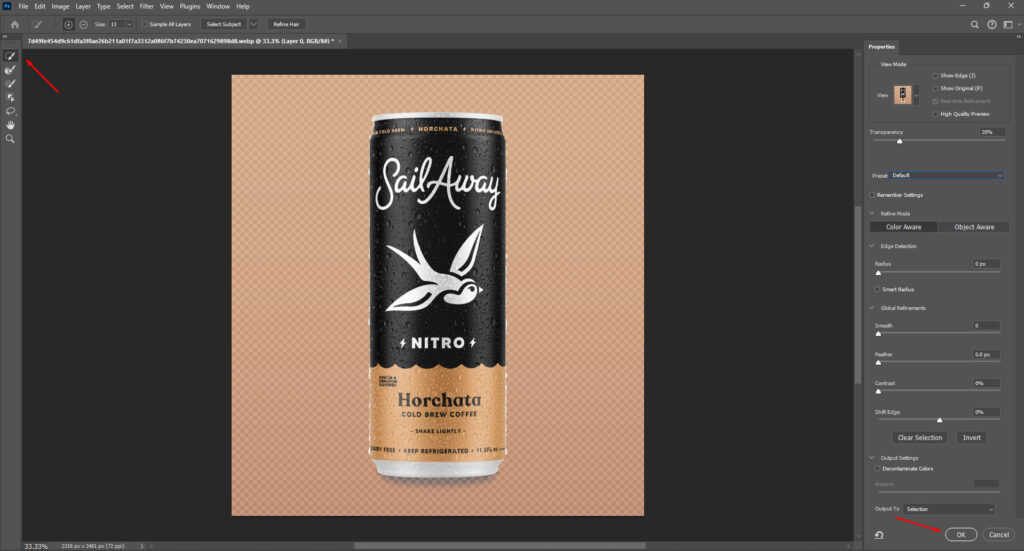
When you click “Select and Mask,” it will take you to a different window in the option bar. You will find an option called “Select the Subject” in the new option bar.
Once you select the subject, the background will remain selected in red except for the main subject. However, the auto-subject selection may not be perfectly accurate.
In this case, you can use the “Quick Selection Tool” and zoom in on the picture to deselect the edges of the subject correctly. If you accidentally deselect an area, you can use the “Add to Selection.” After you complete the selection, press “OK” to complete this process.
Step 3: Create a Duplicate Layer
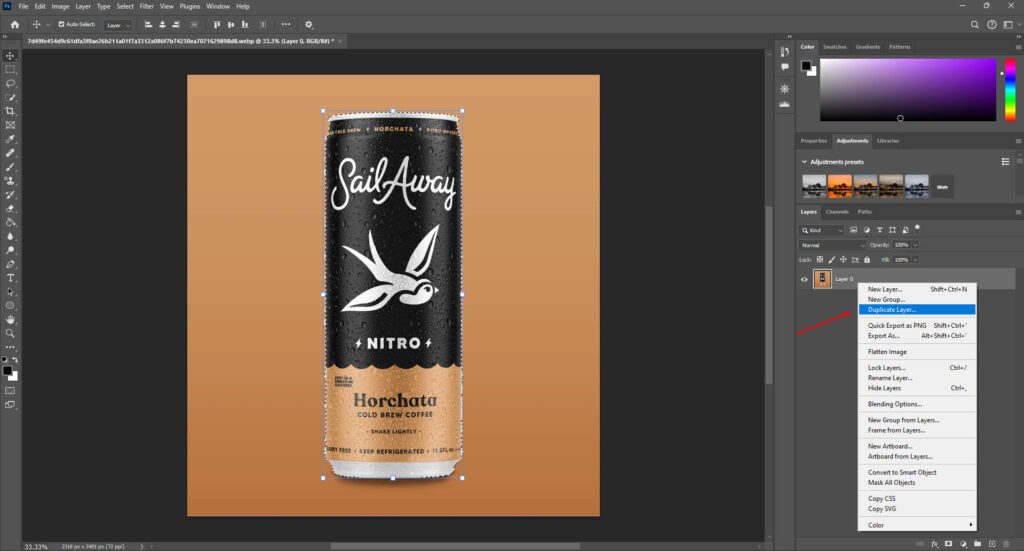
After pressing OK, you will see that the subject has been selected and the background has been deselected from the red selection.
While the main subject is still selected, click on the menu in the “Layer Panel” and select “Duplicate Layer.” The menu is located in the panel at the upper right corner.
Now, a dialogue box will pop up on the screen, and you can name the duplicate layer as the main subject or anything you want. Then press OK.
Step 4: Mask the Duplicate Layer
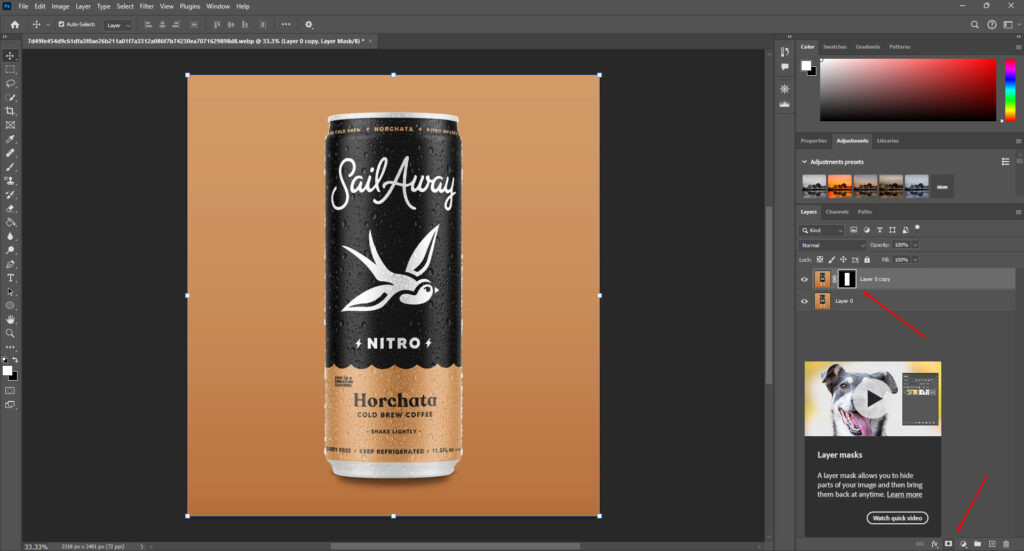
Your main subject should still be selected in the photo. Select the new duplicate layer in the layer panel and click the “Add Layer Mask” icon from the bottom panel.
Step 5: Add a New Fill Layer
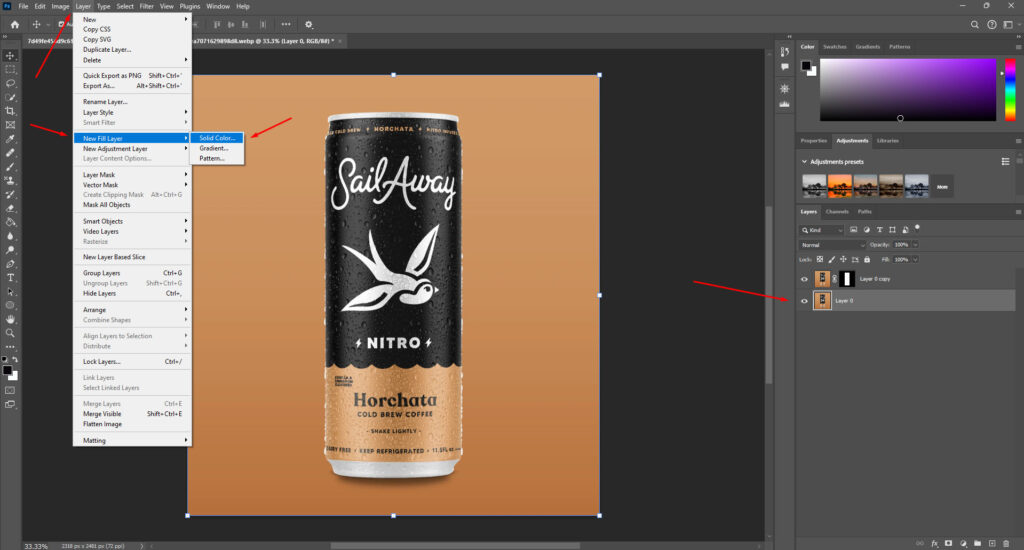
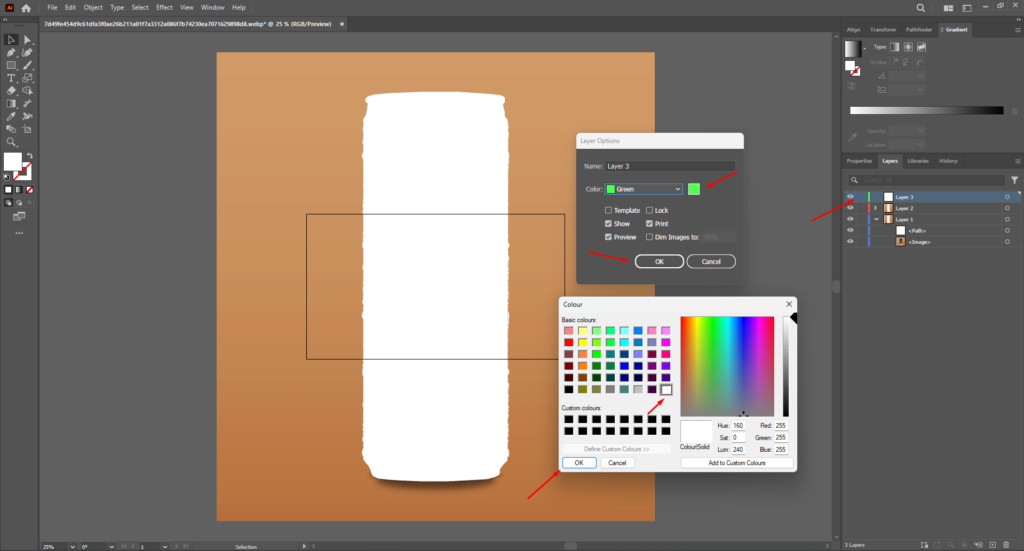
Now go to the original layer and click “Layer” at the top of the screen. From the “Layer” options, select “New Fill Layer.” A few more new options will be elaborated after clicking “New Fill Layer,” select “Solid Color” from the options.
Step 6: Add Color to the Background
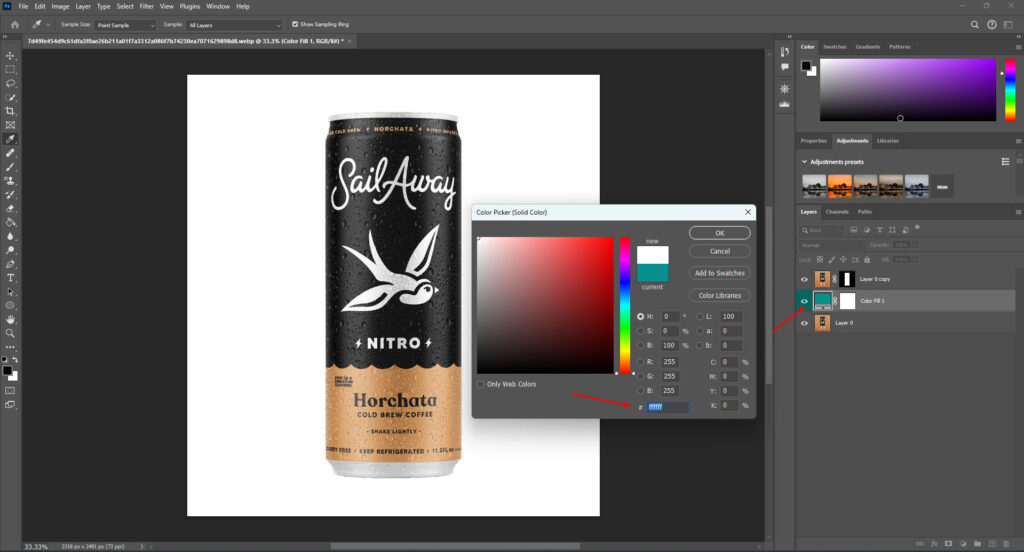
To make the photo background white, you need to fill the background with white color.
When you select the “Solid Color” option, a new dialog box will appear on the screen. Select the white color from the color picker or use the white code “FFFFFF” in the bottom “#” box.
After you press “OK” in the “Solid Color” dialog box, you should see that the existing background in the photo has been changed to white.
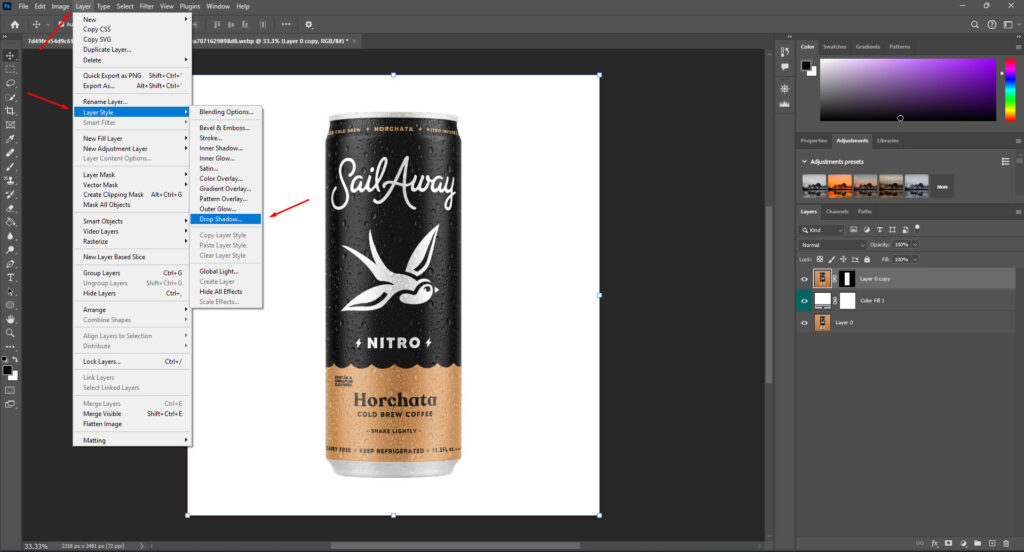
Step 7: Add Shadows and Retouch the Photo
You need to retouch the photo to make the white background look more realistic. Adding shadow and highlighting around the main subject will help you to make the photo look real.
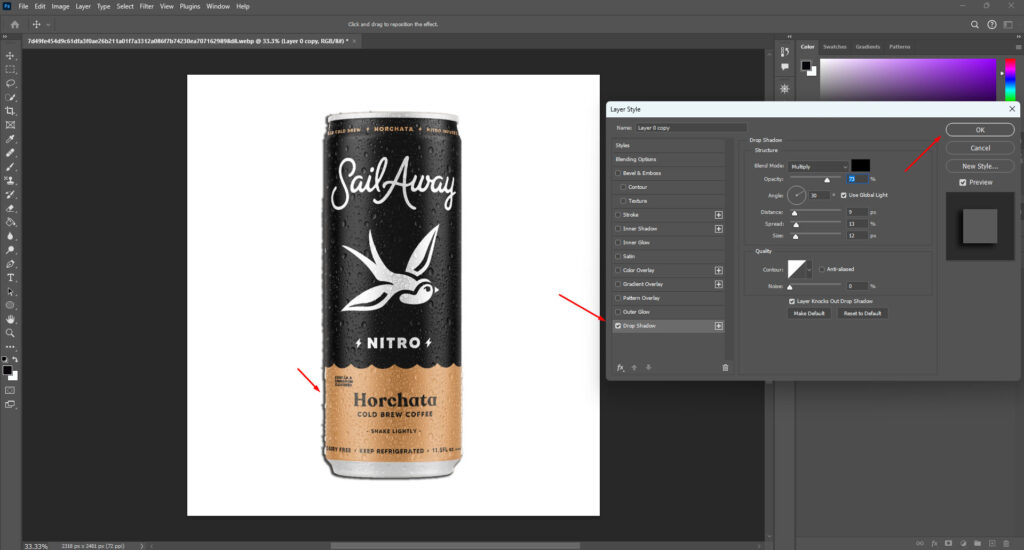
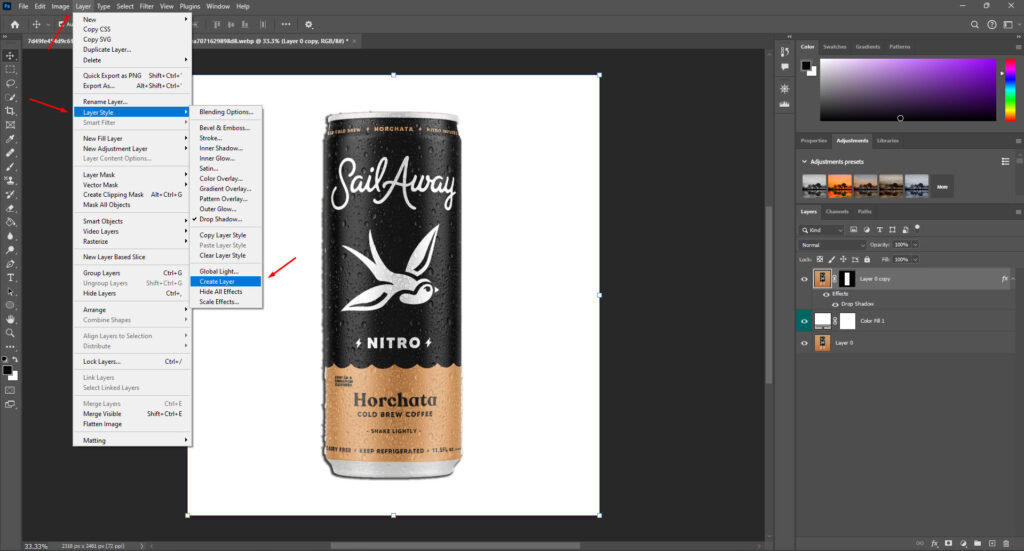
Select the duplicate layer and go to the “Layer” at the top of the above bar. Now click “Layer Style” and then “Drop Shadow.”
A new dialog box will pop up from where you can adjust the position of the Drop Shadow. Once you have the satisfying position and angle of the Drop Shadow, click OK.
Step 8: Separate the Shadow Layer
Again, click on the “Layer” and go to the “Layer Style” and then “Create Layer.” Once you separate the shadow layer, a new layer will appear in the Layer Panel. Select the new Shadow layer.
Now, you can blur the shadow to make it look more practical. Select “Filter” from the top above layer panel and go to the “Blur” option. You can add blur types and adjust them in the new dialogue box according to your preference.
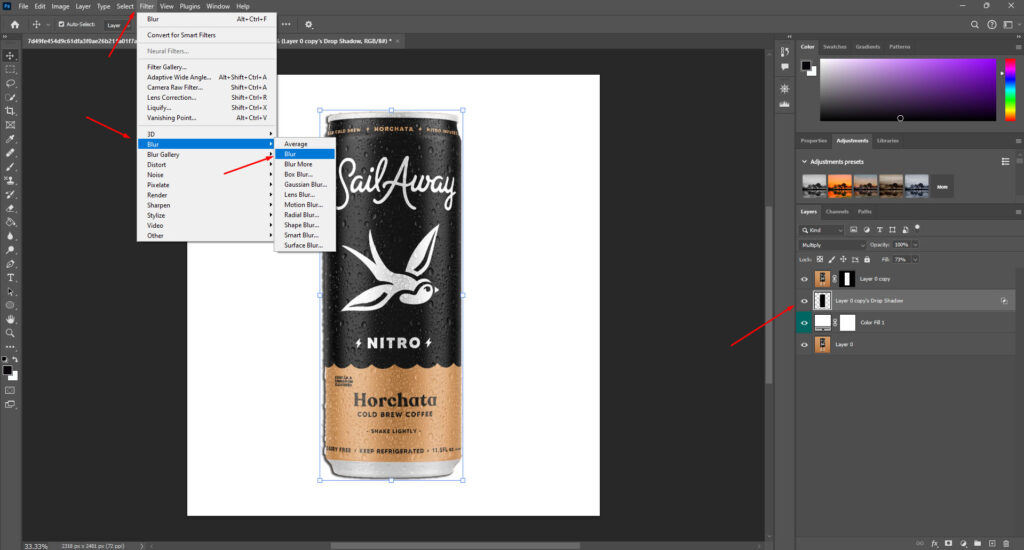
Use the Eraser tool and opacity option in the Layer Panel to fix the shadow to your liking. Once you are satisfied with the final photo, save the picture in your required format.
How to Make a Background White in Illustrator
The process of making the background white in Illustrator is pretty similar to Photoshop, and it is probably easier than Photoshop. Here is the step-by-step guide:
Step 1: Separate the Main Object
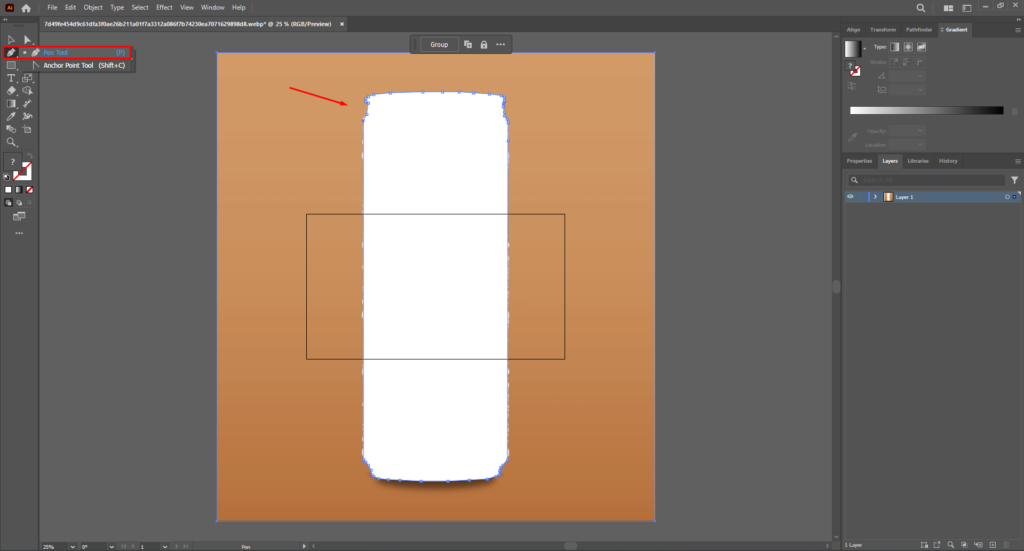
First, open the image file in Illustrator on which you want to work. You can use the Pen tool to accurately trace a selection around the subject shape. Hold down the Shift key to make straight lines while creating a selection around the edges.
Step 2: Copy and Paste the Selection
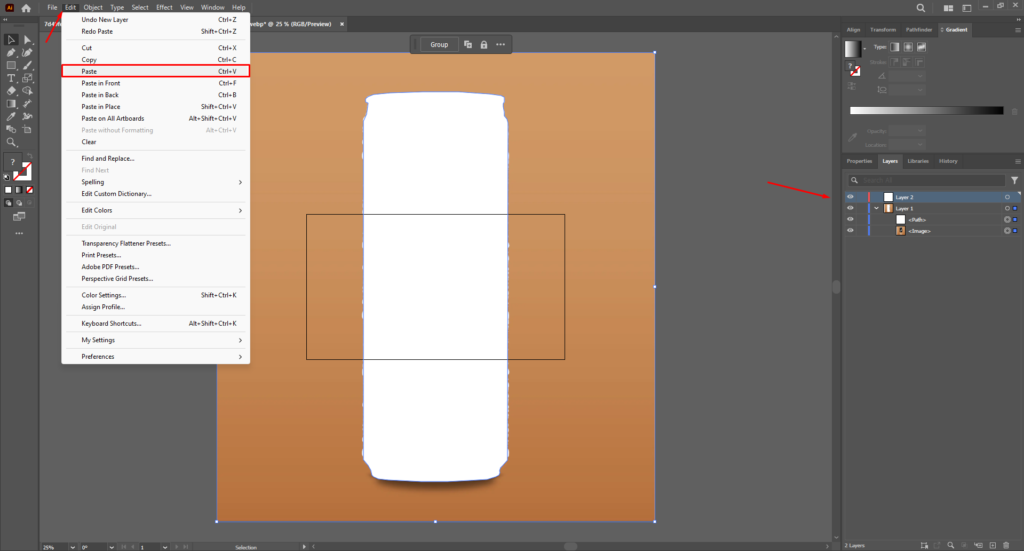
Once you are done with the selection, press “Ctrl + C” to copy the selected subject. After copying, click outside the Illustrator canvas to deselect the subject. Now, go to the top above the bar and find “Edit.”
Make a new layer to paste the copied subject on. Click on “Edit” and select “Paste in Front” to place the copy of the subject on top of the layer.
Step 3: Add a New White Layer
Click the “Create new layer” button at the bottom of the “Layers panel” to add a new layer. Now, hit the color swatch icon at the bottom of the workspace to open the color swatches panel. Click on the white color swatch within the open panel to fill the layer with white color.
Step 4: Bring the Separated Subject above the New Layer
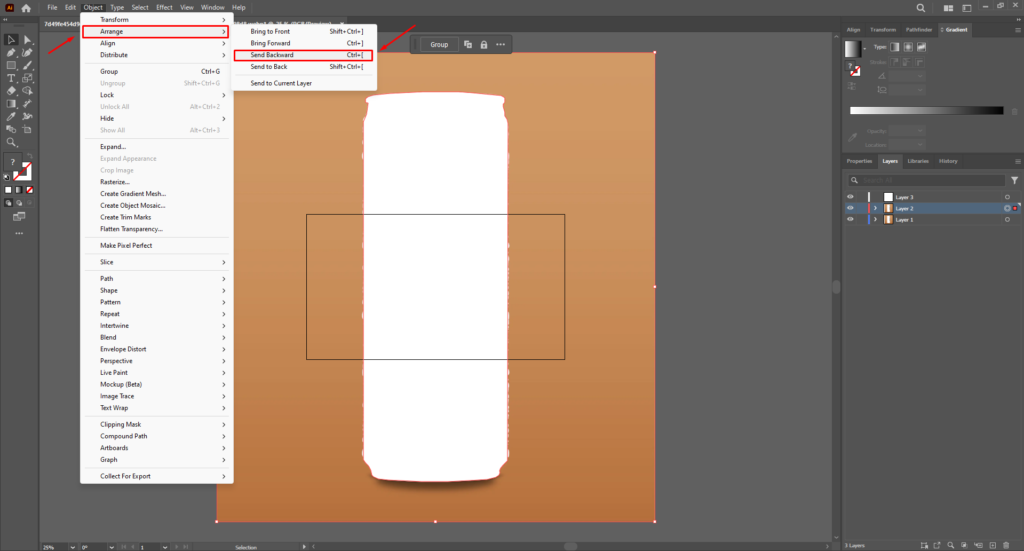
Now, you have a new white layer that will work as the background. Select the copy-and-paste layer, then go to “Object” and click on “Arrange.” Choose “Send to Forward” from the elaborated options to move the subject on top of the new white layer.
Step 5: Arrange the Subject
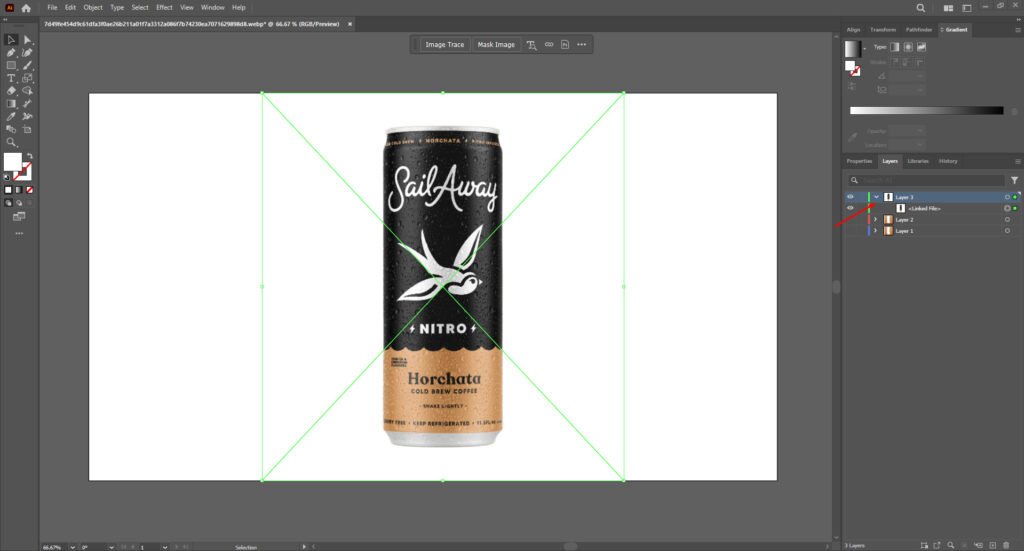
Once you bring the subject on top, set its position and align it accordingly with the white background. If the edges of the subject are not perfect, you will need to work on the subject selection.
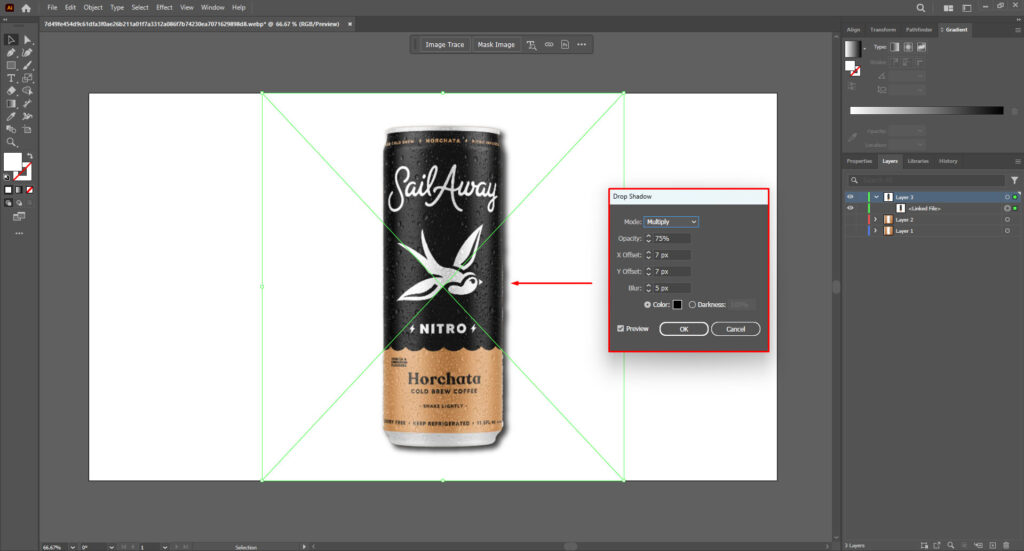
Step 6: Retouch the Subject
Just like in Photoshop, you need to work on retouching around the subject to make it look more natural. We will also use “Drop Shadow” in Illustrator to add shadow.

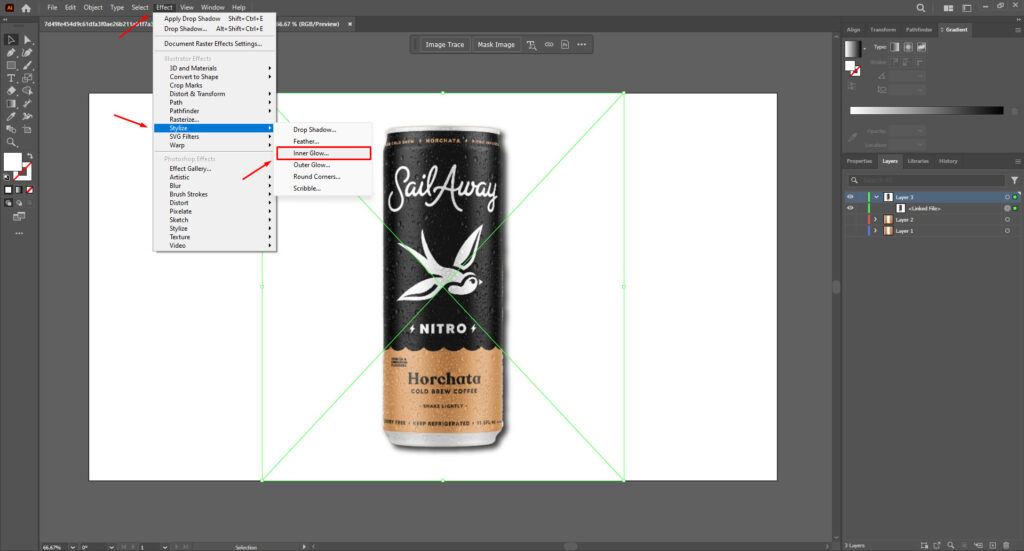
Select your subject layer and go to “Effect.” From the options, click “Stylize” and then “Drop Shadow.” In the “Drop Shadow” options, adjust the settings like Offset X/Y, Blur, Color, etc., to create a shadow below the subject.
Next, go to ‘Inner Shadow” from “Stylize” and adjust the settings to add the inner highlight effect. Once you are satisfied with the shadow editing, save the file in the required file format.
Other Ways of Making Background White
There are generally two other ways of changing the background — re-clicking the photo on a white background and using a white background photo editor.
Practical White Background
Retaking the picture on a white background is an easy and practical way. You can use a white fabric (muslin, satin, or velvet) or use a large white sheet. If you want to avoid white background photo edit, this is the best way to make the background white.
Online Photo White Background Changer
Another easy option compared to Photoshop is using an online photo editor to change the background color to white. You have several options for online automatic editors, such as:
However, remember that these online editors may not provide a perfect photo with a pure white background as they would when editing the photo in Photoshop. Still, you can rely on these free online editors for quick changes for a less intricate subject in the photo.
Some of these tools, like Photoroom, Fotor, and Picsart, can be used to remove backgrounds of logos and other images. But still, you’ll get the best result when using Photoshop to remove the logo background and from other photos.
Why Should You Make Background White?
Before you get into the step-by-step guide for making a white background photo, let’s learn why a white background is necessary. A white background is not just a one-trick pony; it’s versatile and can be used as a jewelry background or with almost everything.
This background option is a professional standard, not just a product photo trend. It’s used for professional photos, logos, e-commerce product photos for Amazon storefronts, and social media posts.
A white background offers the photo a clean, quality, and professional look, elevating your brand’s image and making your products stand out. Here are some reasons why you should make background white:
Strengthen Focus
You can easily make distractions disappear when you add a white background to a photo.
When someone comes across your photo with a white backdrop, it will hold their focus only on the subject. Therefore, it’d be convenient for you to showcase the product details to the viewer.
Increase Sharpness
When it comes to highlighting the main subject, you must ensure a contrast between the background and the subject.
You can easily create an evident contrast of the subject against a white background. As a result, textures, colors, and all the subject details will have better visual clarity.
Promote Brand Identity
Professionalism matters. White backgrounds project a clean, high-quality image, elevating your brand and making your products stand out. It’s a win-win for brand identity.
Conclusion
To conclude, how can you make the background white in a photo? You can either use a manual way of clicking the photo on a white background or using Photoshop and Illustrator to change the existing background. Online automatic background changer to white is a go-to option for less intricate products.
When changing the background to white in Photoshop, work on the subject’s edges with more care and attention. After adding the white color, you should spend time retouching the photo to prevent unnatural contrast.
Remember, the more time and attention you can invest in editing the photo, the better quality result you can achieve!
Meta Clipping Path – A well-known one-stop photo editing service provider company with 5+ years of experience and 25+ highly skilled professionals.
Working with 20 reputed worldwide e-commerce companies and 200+ satisfied customers.

![Read more about the article How to Change Background for Photography Editing [Edit Photos on Photoshop Like a Pro]](https://metaclippingpath.com/wp-content/uploads/2024/06/Background-for-Photography-Editing-300x160.png)
![Read more about the article Top 10 Photoshop Background Effects for Your Photography [Easy Photo-editing Tips]](https://metaclippingpath.com/wp-content/uploads/2024/06/Photoshop-Background-Effects-300x160.png)