![You are currently viewing What is Clipping in Photography? [Everything You Need to Know]](https://metaclippingpath.com/wp-content/uploads/2024/06/Clipping-in-Photography.png)
Dealing with completely washed out or pitch black. This is a common issue in photography, often caused by improper lighting or inaccurate exposure, contrast, or shadow settings. In photography, we call this problem clipping.
But what is clipping in photography?
Clipping in photography occurs when your camera captures an area of the photo that’s either too bright (highlights) or too dark (shadows) with absolutely no details. These areas appear as “blown-out” whites or solid black patches, ruining the overall quality of your image.
So, are there ways to fix or prevent this issue? Yes, there are techniques that can help you minimize clipping during shooting. If you’re interested in learning how to achieve this, let’s explore this topic further!
What is Clipping in Photography?
Clipping in photography is generally related to an error in the photo, which indicates an area of your picture with no data. For example, you may not see any information on a certain area of your picture due to brightness (looks white) or shadows (looks black).
It’s because information in those areas was lost due to a lack of light while capturing the photo. This is what is called clipping in photography. Generally, no photographer prefers having clipped areas on their photo, as it ruins the image.
What Causes Clipped Areas in Photos?
Clipped areas – those strange patches of blown-out whites or inky blacks – can plague your photos during capture or editing. Here’s a breakdown of the common issues:
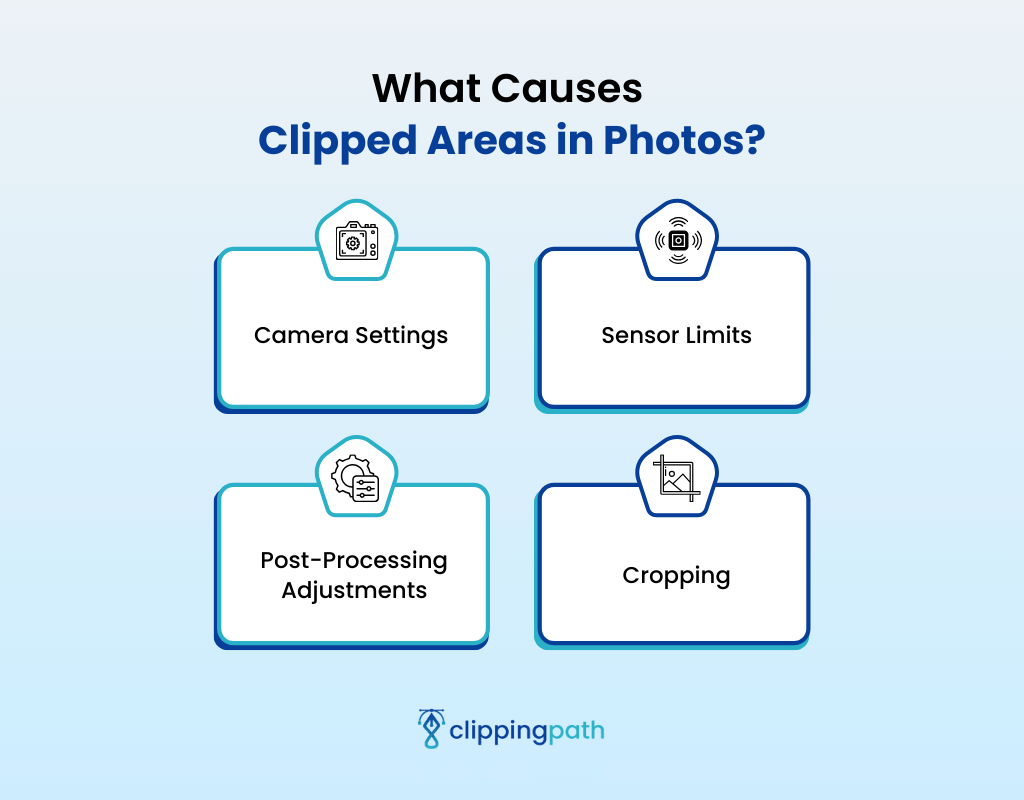
Camera Settings
Improper camera settings like aperture, shutter speed, and ISO can lead to clipping. Imagine these settings as tools to control how much light reaches your camera sensor. Here’s how they can go awry:
- Aperture: A wider aperture (low f-number) lets in more light, potentially overexposing highlights. Conversely, a narrow aperture (high f-number) lets in less light, risking underexposed shadows.
- Shutter Speed: Faster shutter speeds in low light can lead to underexposed photos, while slower speeds in bright light can overexpose highlights.
- ISO: Higher ISOs increase light sensitivity, but also introduce noise. This noise can exacerbate clipping during editing.
The key is to find the optimal settings for your lighting conditions using your camera’s light meter as a guide.
Sensor Limits
Every camera sensor has a dynamic range – the range of brightness levels it can capture accurately. When photographing extreme contrasts, like a sunset, the sensor might struggle. The brightest highlights and darkest shadows may lose detail, causing clipping.
Post-Processing Adjustments
Editing software like Photoshop offers powerful tools, but overuse can lead to clipping. Here are some common culprits:
- Heavy-handed filters: Applying strong filters can easily clip highlights or shadows.
- Dodging and burning: These techniques lighten or darken specific areas, but overdoing them can clip details.
- Extreme tone adjustments: Pushing exposure, contrast, or clarity too far can lead to clipping.
That’s why you must know how to remove clipping masks in Photoshop to avoid clipping.
Cropping
Have you ever taken a photo from too far that you needed to crop later? Yes, we all have been there. But this cropping can easily lead to photo clipping. Imagine a picture of a large tree with a hectic background.
You may think of cropping the image to keep the picture free from unwanted background elements. But it may cut out the branches of the tree while cropping.
Similarly, when you crop a picture, it may remove important highlight or shadow details from the clipped areas that were once full within the frame.
Tools to Find Out Clipping in Your Image
Having a hard time finding the clipping area in your image? You can use tools to find clipped areas at your convenience. Use the two following tools:
Histogram
This tool offers analysis results in graphs that show a picture’s exposure level. The left side of the graphs specifies the shadows on your photo. On the contrary, the right indicates the highlighted areas.
The histogram also represents the number of pixels in a specific exposure range through histogram height. If the histogram is heavily concentrated on one side, you’ll need to adjust the exposure of your photo.
If the histogram graph shows a good balance of columns on both sides, it indicates that your photo doesn’t have a clipped area.
Internal Light Meter
This tool studies your photo to discover underexposed and overexposed areas within the image. When you read through the internal light meter results, you’ll be able to find out if your photo has a clipped area.
But what is the indication of clipping in the result? The answer is simple —
- If the light meter shows more than +3 or –3, your photo has clipping areas that can’t be removed.
- On the other hand, a light meter result containing +2 or -2 indicates that your photo still has clipped areas, which may be fixed with post-editing.
How to Fix Clipping in Photography
So, you’ve identified clipped areas in your photos – those frustrating patches of lost detail. Unfortunately, recovering completely missing data is nearly impossible. Here’s why:
- No Data, No Recovery: Clipped areas lack any image information. Imagine a photo as a map – clipped areas are empty spaces with no details to retrieve.
- Prevention is Key: The best approach is to avoid clipping in the first place by using the right camera settings and lighting for your scene.
However, there’s a glimmer of hope! If your clipped areas retain some detail, you might be able to salvage them using Photoshop. Here’s a step-by-step guide:
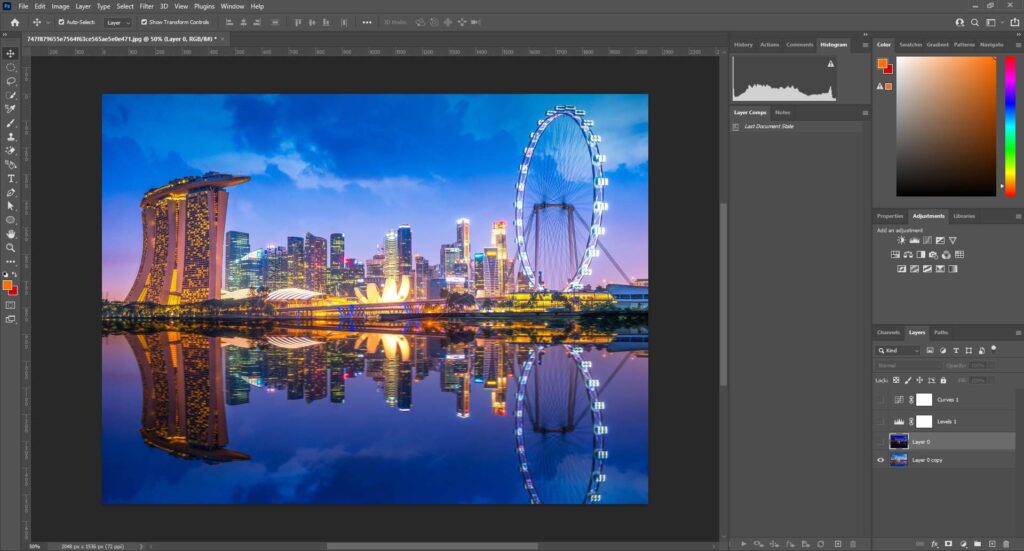
Step 1: Open the Image and Duplicate It
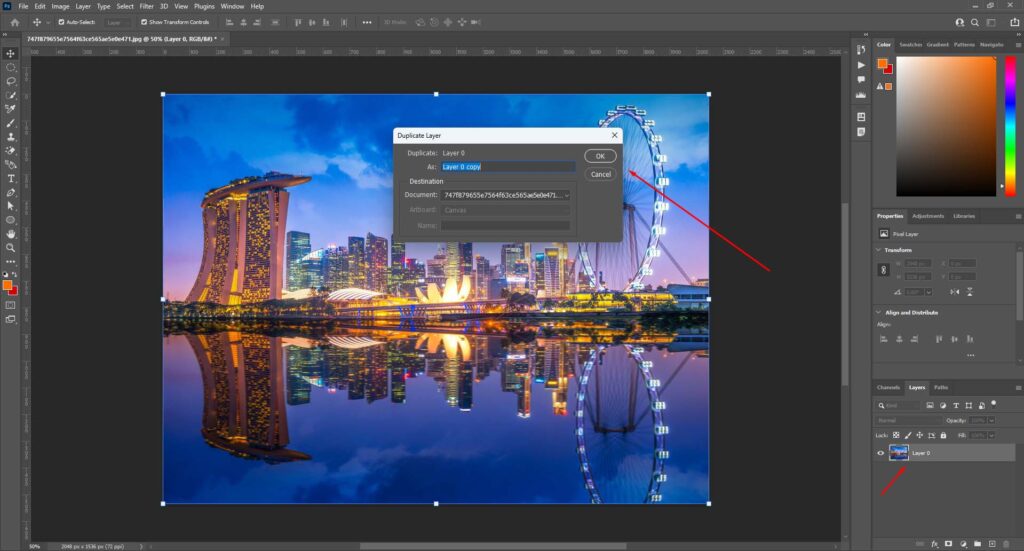
Open your photo in Photoshop. To avoid altering the original, create a duplicate layer by right-clicking on the background layer in the Layers panel and selecting “Duplicate Layer.”
Step 2: Open the Histogram Panel

Go to “Window” > “Histogram.” This panel displays the tonal range of your image, with clipped highlights appearing on the far right and clipped shadows on the far left.
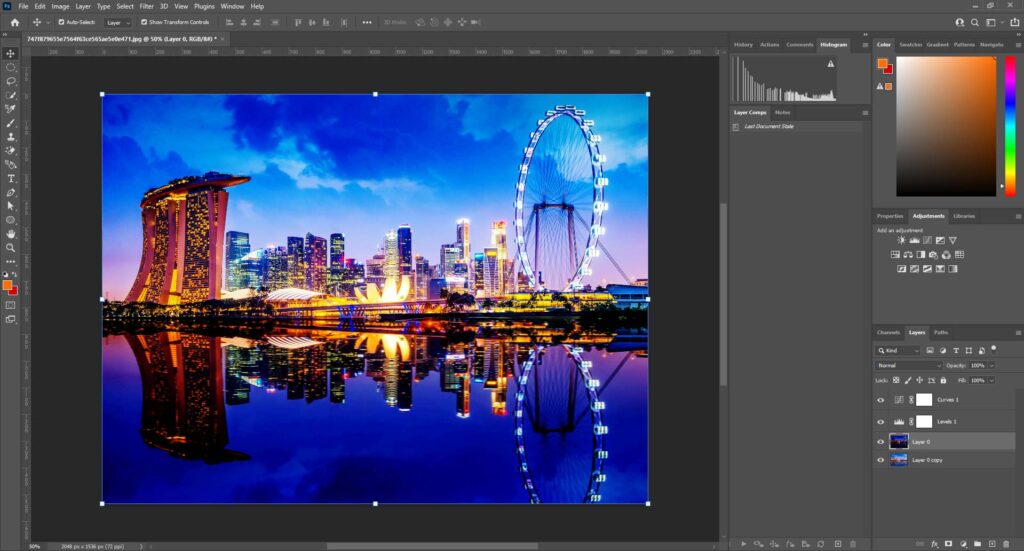
Step 3: Make the Adjustment
To make adjustments in your photo to fix clipping, you may either need to use the “Level Adjustment” or “Curves Adjustment” accordingly.
Level Adjustment

If you want to increase or decrease contrast in your photo to reduce clipping, use the “Level Adjustment.” Go to Image > Adjustments > Levels. When the dialog box opens, you see two adjusting sliders — black and white.
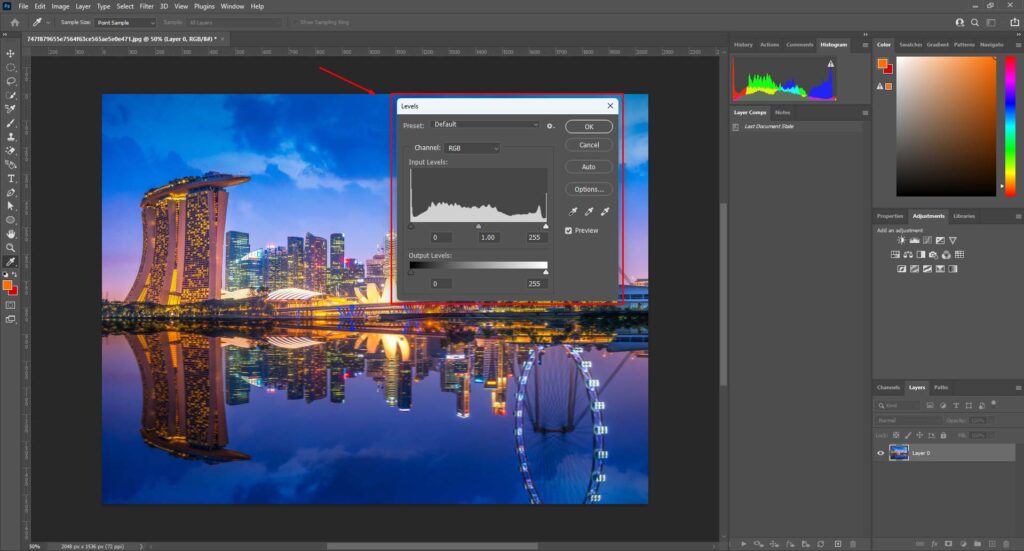
Play with these two sliders to adjust the contrasting level and redistribute the pixel values in your photo.
Curves Adjustment

This option will help you to slightly recover details from the clipped areas. To access this option, go to Image > Adjustments > Curves. In the Curves dialog box, you’ll see a diagonal line representing the tonal range.
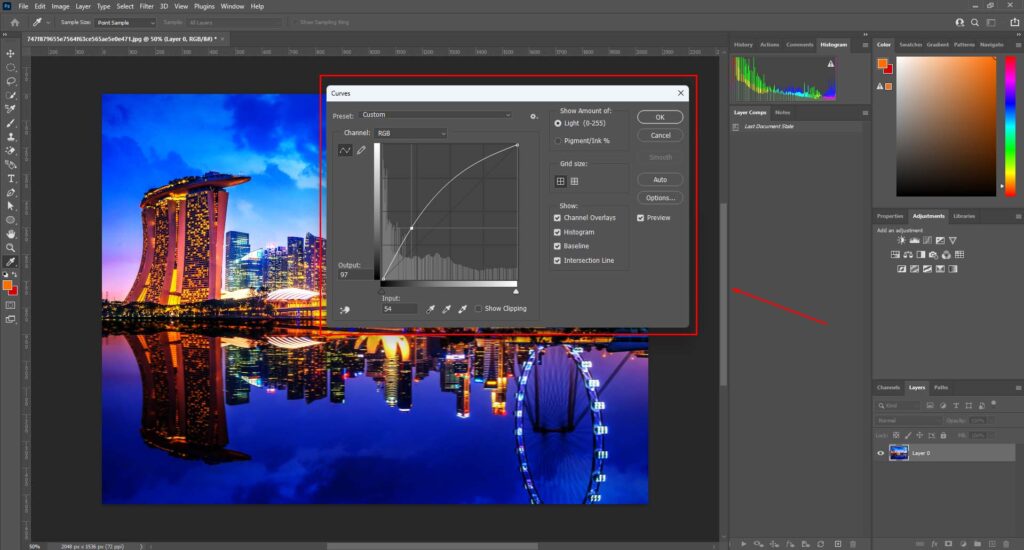
Click and drag on the line to adjust the curve level. Lift or lower the curve at the clipped areas to recover detail and reduce clipping.
Step 4: Compare Before and After, then Save
Once you’re satisfied with the adjustment to reduce clipping, check the before-and-after of your photo. If you think the photo has improved and doesn’t need any more adjustment, save the picture in your desired format.
If editing feels overwhelming, consider clipping path services that offer professional image editing solutions.
Remember: While some recovery is possible, extensive clipping might leave your photo permanently affected. Always strive to capture photos with proper exposure to minimize clipping and maximize image quality.
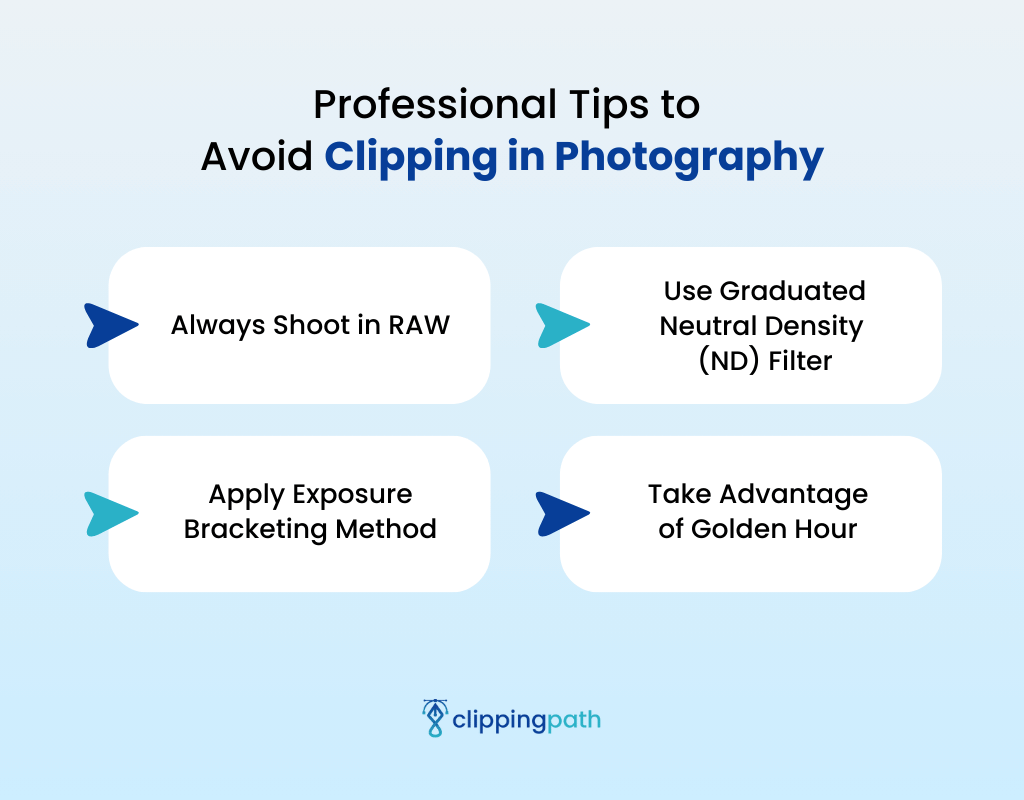
Professional Tips to Avoid Clipping in Photography
Now that you’re armed with clipping knowledge, here are some practical tips to avoid it altogether while shooting:
Alt: Professional Tips to Avoid Clipping in Photography
Always Shoot in RAW
Ditch JPEGs and shoot in RAW format. This captures unprocessed image data, giving you more flexibility and detail to recover minor clipping during editing later. Think of it as having more information to work with.
Use Graduated Neutral Density (ND) Filter
Graduated neutral density filters are handy tools to balance exposure in scenes, which makes this filter a go-to option for landscape shots. It represents a significant contrast between the sky and the foreground.
Therefore, you can reduce the intensity of the bright sky, maintain exposure levels, and retain more detail in both areas.
Apply Exposure Bracketing Method
his technique involves taking multiple photos of the same scene with different exposure settings. You might capture one image properly exposed, another slightly underexposed, and another slightly overexposed.
Later, during editing, you can combine the best parts of each image using tools like layer masks or clipping masks in Photoshop to create a final photo with perfect exposure and minimal clipping.
Many modern cameras even offer an automated bracketing mode that can click a maximum of 9 photos with one click with different exposure levels. So check your camera’s manual!
Take Advantage of Golden Hour
This magical time, shortly after sunrise or before sunset, bathes the scene in soft, warm light. It’s the photographer’s dream!
Golden hour light helps you avoid capturing areas that are too bright or too dark in the first place, significantly reducing the chances of clipping.
Conclusion
So what is clipping in photography, and how do you avoid it from getting in the way? In short, the clipping area has missing details, which probably can’t be restored anymore.
That’s why you should follow professional tips to avoid clipped areas while taking a photo. Ensuring proper light while shooting is crucial to reducing this problem. Clicking the picture with no additional settings and using exposure bracketing are two friendly tips for avoiding clipping.
Another tip is to use your camera’s histogram to maintain a balanced exposure, contrast, and tone. This will help you reduce clipping a lot while photographing!
Meta Clipping Path – A well-known one-stop photo editing service provider company with 5+ years of experience and 25+ highly skilled professionals.
Working with 20 reputed worldwide e-commerce companies and 200+ satisfied customers.