![You are currently viewing How to Add Drop Shadow to Image [A Step-By-Step Guide]](https://metaclippingpath.com/wp-content/uploads/2024/07/Add-Drop-Shadow-to-Image.png)
Does the main subject in your photo look lifeless and floating in the air?
A shadow holds the ability to change the quality and mood of the picture while elaborating the subject’s realism. But how can you add a shadow to a subject which doesn’t have a shadow?
You can add drop shadow to the image in Photoshop and Illustrator. The steps of adding the drop shadow are pretty straightforward. You need to create the shadow of the subject, find the light’s incoming source, and make it fall on the ground accordingly.
Sounds confusing? Don’t worry!
We’ll break down the entire process in a comprehensive step-by-step guide and give you some professional tips to achieve the best result. But first, let’s learn the benefits of adding a shadow!
Why Should You Add Drop Shadow to Image
Whether you want to add shadow to your e-commerce or social media photos, you’ll notice a significant difference after adding the photo shadow effect. Here are some reasons why you should add drop shadow to images:
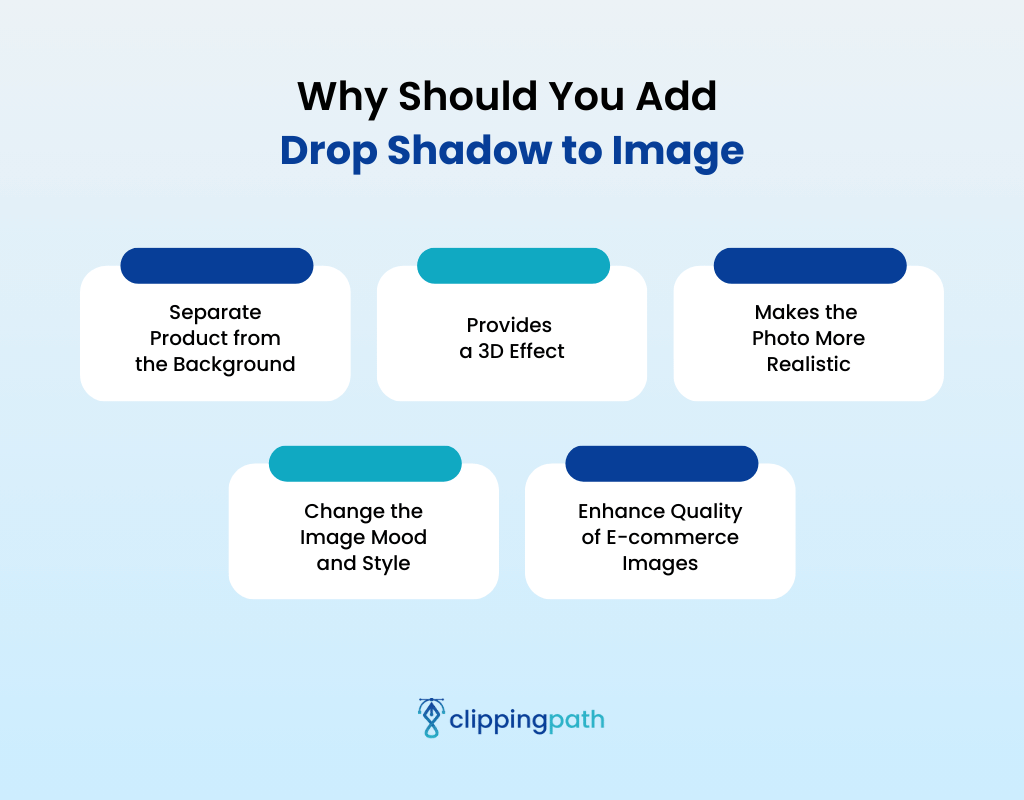
Separate Product from the Background
Suppose the main subject in your photo is white, and the background is white, too. In this case, the subject will blend with the background, ruining the focus of the photo.
Without a drop shadow, the primary subject can appear flat and unrealistic, lacking dimension. But if you add shadow to the image, it’ll make a contrast of the subject against the background.
A shadow will separate the product or person and can successfully draw the viewer’s attention.
Provides a 3D Effect
The image drop shadow effect can add depth and dimension that give off the illusion of a 3D effect.
This will make the subject appear as if a distance exists between the subject and the surface. Generally, icons and logos prefer having this 3D effect to stand out.
Makes the Photo More Realistic
When there is no shadow around the subject, it’ll look like the subject is floating in the background. However, a shadow image can make the subject look more natural and grounded.
In this case, the light source and its reflecting direction are important to notice in order to drop the shadow correctly.
Change the Image Mood and Style
The image drop shadow CSS effect is not limited to adding a natural look only. By adding a shadow, you can change your photo’s mood and style. For example, you can create a light and cozy mood by adding a subtle and soft shadow.
Again, adding a long and dark shadow can create a mood of suspense and mystery in your photos.
Enhance Quality of E-commerce Images
The quality of your photo can attract more customers; therefore, you need to focus on enhancing your e-commerce image quality.
Just like removing the shadow can sometimes make the photo standard, adding a shadow can also increase the quality and appeal to customers. Besides, your quality image can improve brand awareness as well.
How to Add A Drop Shadow to an Image in Photoshop
The drop shadow is a non-printing layer effect that creates a dark counterpart of an image, text, or shape slightly offset from its base. You can easily add this shadow in Photoshop within half an hour.
Here are the steps of how you can add a drop shadow to a picture in Photoshop:
Step 1: Open and Duplicate Image Layer
First, you need to open the image in Photoshop to set the working area. Then, select the image and hit “Ctrl + J” to duplicate the main image.
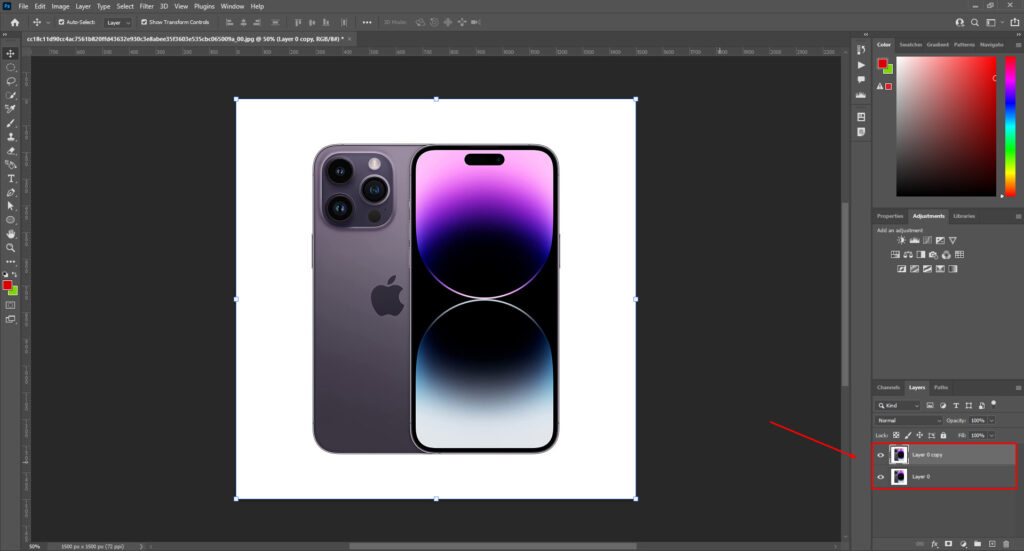
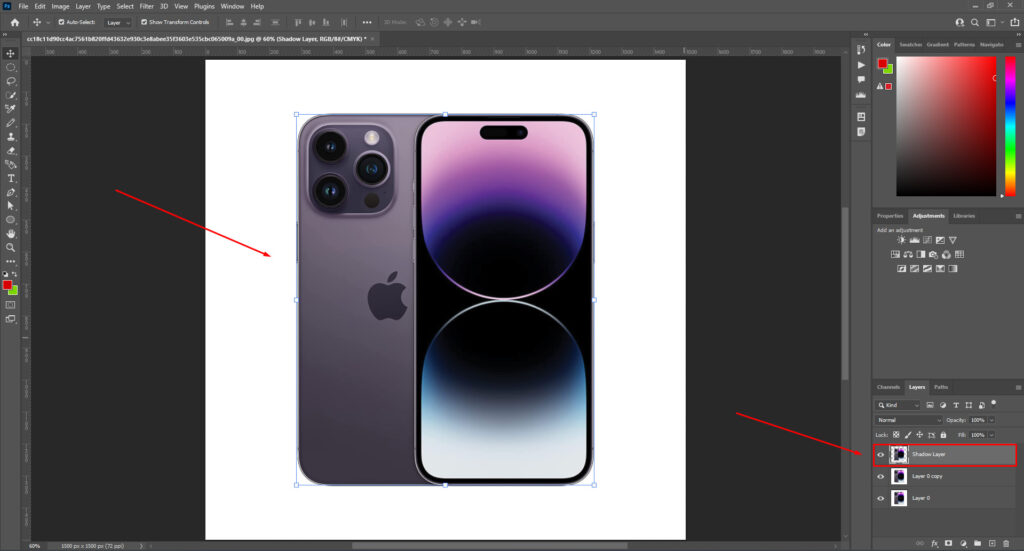
Step 2: Make a Selection and Copy It
Pick the Pen tool from the toolbar and draw lines around the subject’s edges to select it. After you’re done selecting the subject, duplicate the selection by pressing Ctrl + J for Windows or “Cmd + J” for Mac. Name this selection layer as ‘Shadow Layer.’
Step 3: Transform the Copy to Shadow Angle
Now, you need to use the Transform tool as a photo to shadow converter. Press “Cmd/Ctrl + T” or pick it from the toolbar to activate the Transform tool. Moving on, click on the right side of your mouse and choose “Distort.” You can also pick Distort from “Edit” > “Transform”
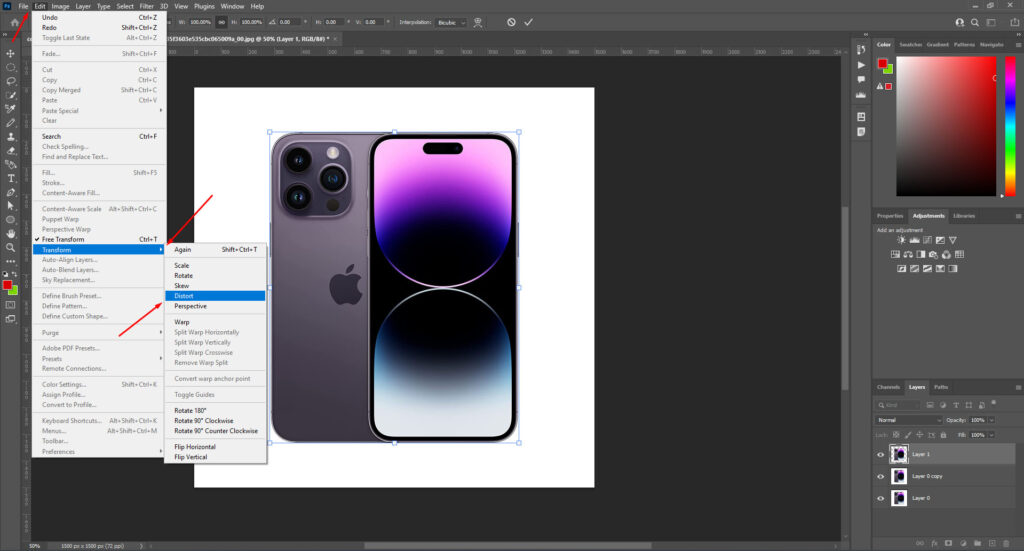
It’ll let you set the shadow drop angle; make sure you follow the light-reflecting direction in this step. In case you need to move the shadow position, change the Transform tool to the Move tool.
To pick the Move tool, you can press ‘V’ or manually select it from the toolbar.
Step 4: Create the Shadow
Select the shadow image layer to add a gradient overlay. Go to “Layer” at the top above the bar and click “Layer Style.” From the drop-down menu, choose “Gradient Overlay” to open a new dialog box.
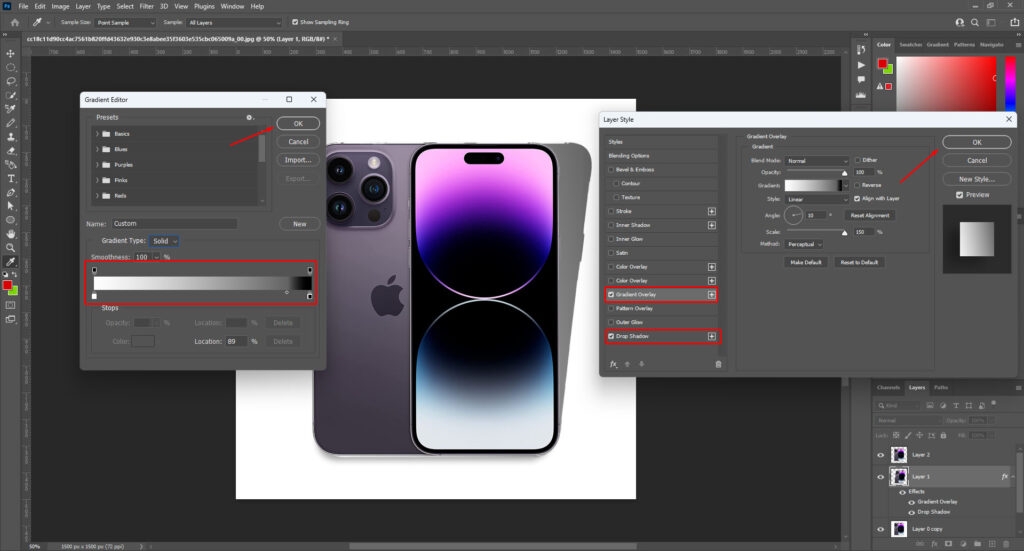
Instead of going to the “Layer,” you can also access the “Gradient Overlay” from the Layers Panel by clicking the “Layer Styles” below. The dialog box will allow you to change the existing color of the shadow.
Use charcoal black and white color as a gradient overlay, as these two colors will give the shadow image a real shadow color.
Now, select “Drop Shadow” from the dialog box, and adjust the shadow angle, distance, and opacity to set it accordingly to add CSS image drop shadow.
Step 5: Retouch the Shadow with Filter and Save It
It’s time for shadow photo editing and adding a blur to the shadow. Go to “Filters” and select “Blur.” You have a few blur options, but we suggest you select the “Gaussian Blur” filter for editing. From the option bar, set the pixel radius for the effect.
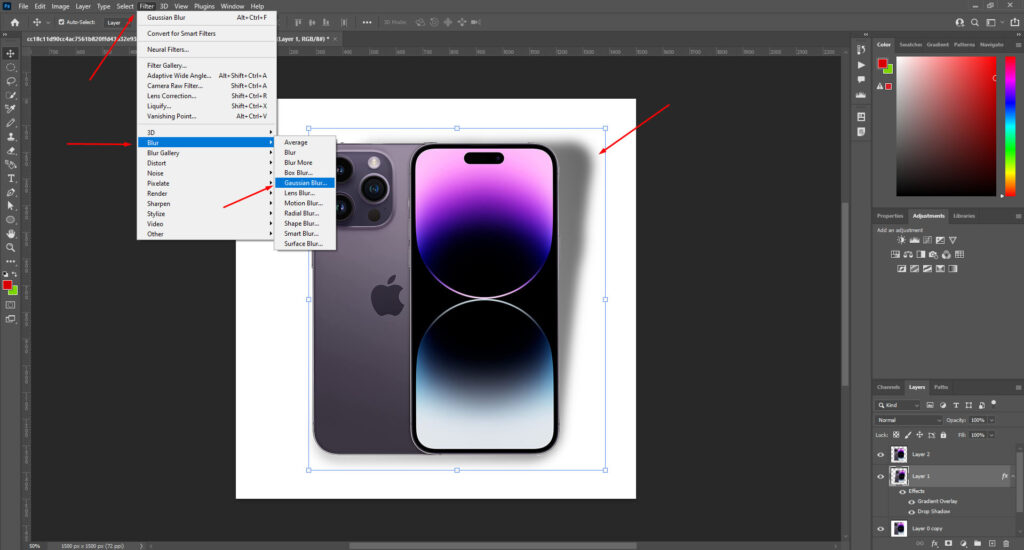
If needed, you can go back to step 3 to adjust the shadow’s position perfectly. You can also play with the Gradient color to make the shadow as natural as possible.
You may need to redo the steps from 3 a couple of times before you get a satisfying result. Work on editing errors and save the picture when you think the shadow is ready!
How to Add A Drop Shadow to an Image in Illustrator
You can also add a drop shadow to your photos in Illustrator. This software has the best drop shadow settings to work with ease. Here’s a step-by-step guide to add shadows in Illustrator:
Step 1: Open the Image and Add Drop Shadow Effect
Open the image in Illustrator and place it on the artboard in Illustrator. Now select the subject with which you want to add the drop shadow. Go to “Effect” at the top of the above bar of Illustrator and select “Stylize.”
Next, click “Drop Shadow” from the Stylize elaborated menu. A new dialog box will appear on your screen with drop shadow settings.
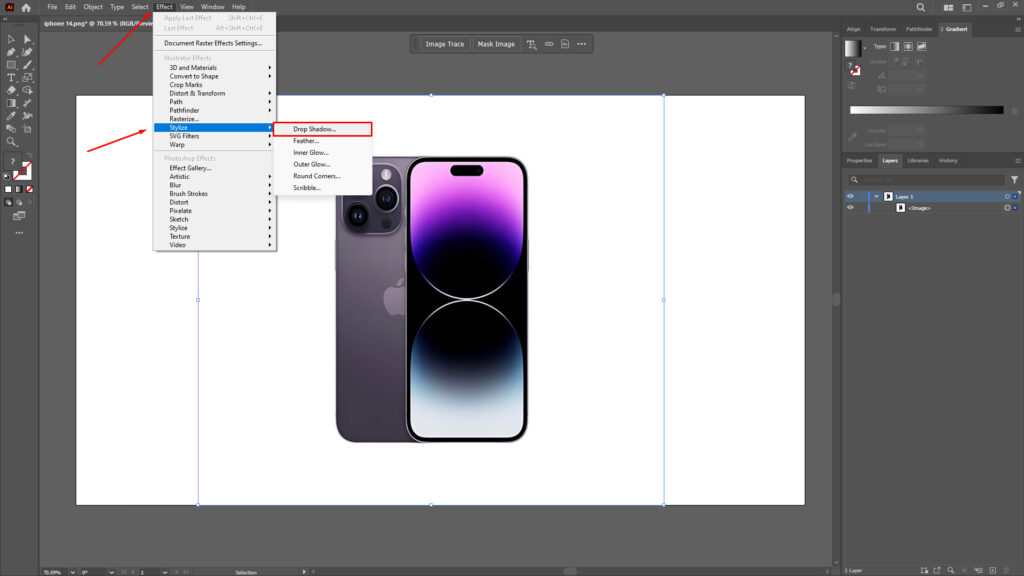
Note: There are two “Stylize” options in the “Effect.” You need to click on the first one. Often, editors click the last one and then can’t find the drop shadow effect.
Step 2: Adjust the Shadow Settings
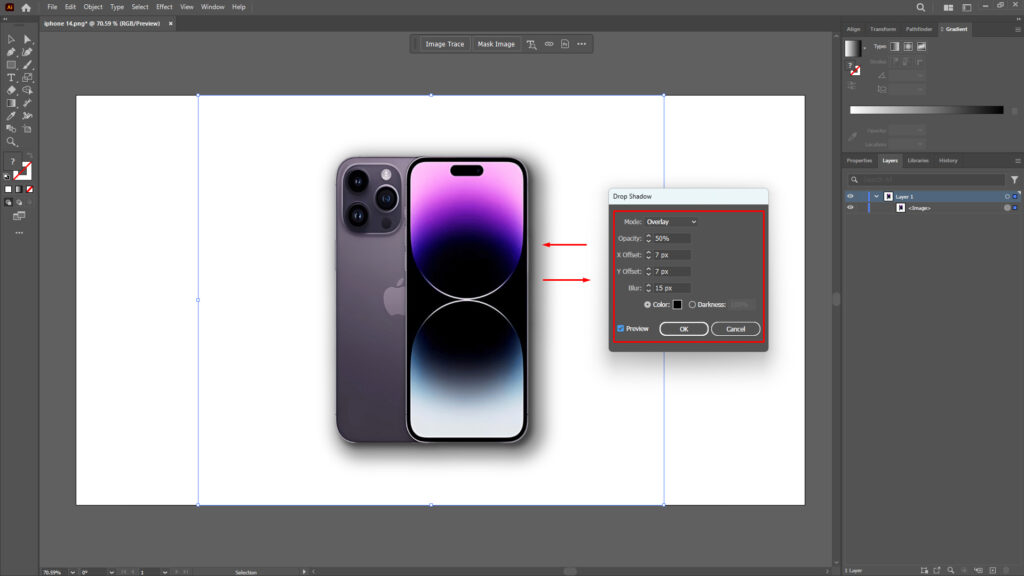
Moving on to the adjustment, you have to set the blend mode, opacity, angle, distance, spread, and size of the drop shadow. What’s the ideal adjustment for these segments? Here are they —
- Blend Mode: You have different options for blend mode; we suggest you pick the “Overlay.” However, it doesn’t mean you can’t pick other options. Pick any and try it out; you may find the best mode for your subject’s shadow.
- Opacity: It indicates the transparency level of the shadow. Most editors start with 50% opacity and then increase or decrease it according to your requirements.
- Shadow Angle: Now, you need to set the drop shadow location for your subject. For this task, you can use the offset setting (X and Y). The Y offset will move the shadow vertically, and the X will move horizontally.
- Shadow Spread: The Spread setting controls how much the shadow edges are feathered or softened at the edges. At 0% spread, the shadow edge will be hard and distinct. If you prefer subtle softness, set it between 5 and 15%.
Now, check “Preview” to see live updates as you adjust settings. If you like the drop shadow adjustment, click “OK.”
Step 3: Color the Shadow
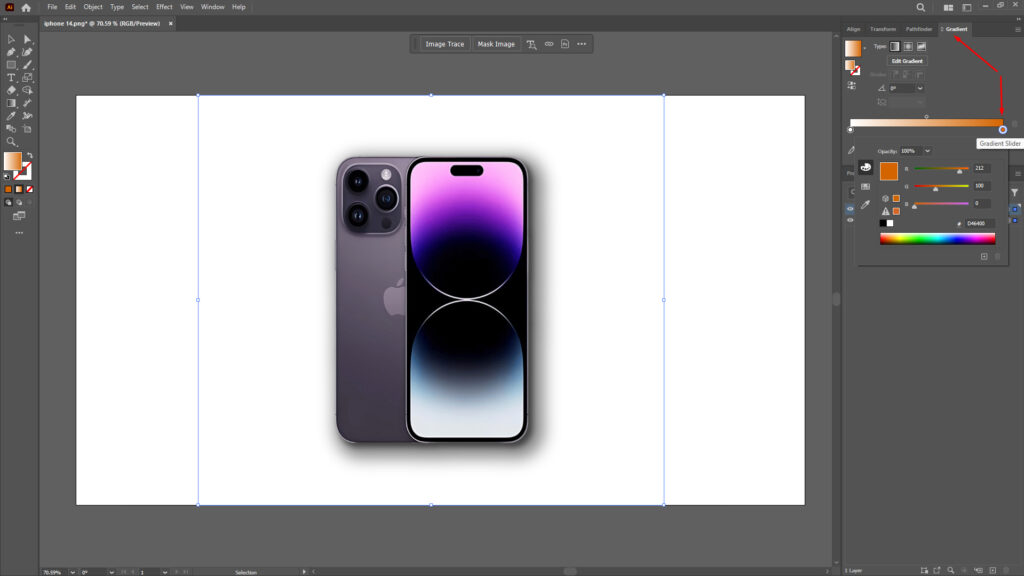
Select the shadow layer and open the “Gradient” tool. While the tool is active, make a gradient line over the shadow to create a natural color of the shadow. You can also keep the shadow totally black instead of adding gradient colors.
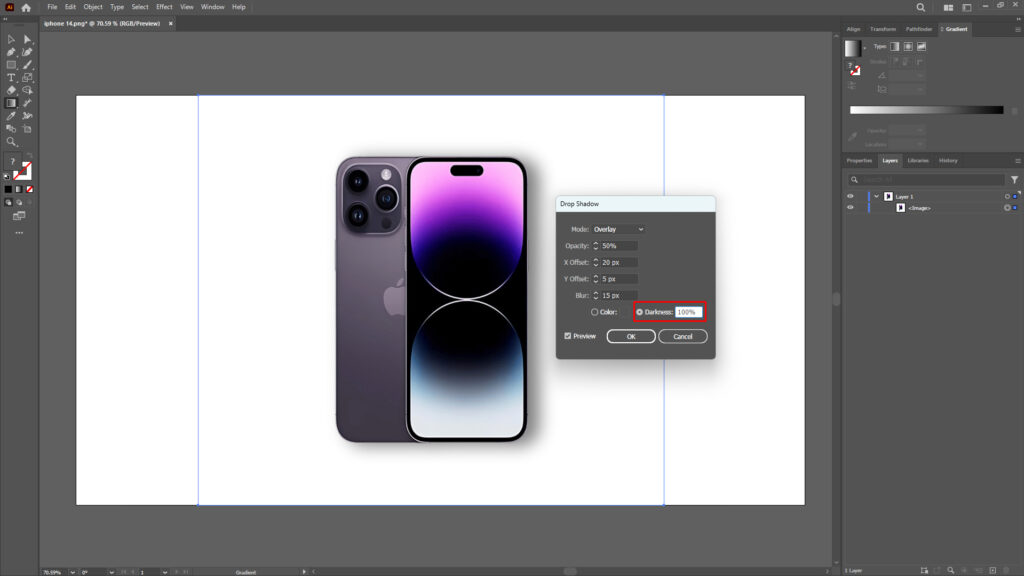
Step 4: Adjust the Darkness of the Shadow and Save
Open the Drop Shadow dialog box again and look for “Color” and “Color Picker” to adjust the darkness of the shadow. You’ll find a slider in the “Color Picker,” move it down towards black to increase darkness and move it towards white to decrease darkness.
If all the adjustments are okay and the drop shadow is added perfectly behind the subject, you can save the image to your required file.
Professional Tips for Adding a Perfect Drop Shadow Effect
Getting the perfect drop shadow to your image using Photoshop and Illustrator is not that difficult. You can also use an online image shadow generator. Still, it may not give you the best results, like Photoshop and Illustrator.
To make the whole working process easier, remember some professional tips. Such as:
- Incoming Light Source — The light source is the key to making the drop shadow look more natural. You must align the shadow drop with the incoming light reflecting direction.
- Opacity — The opacity of the drop shadow can change the mood of the shadow. For example, if you add a low opacity and a warm shadow, it’ll make the shadow mimic the shadow of evening sunlight.
- Blur — Compared to other blur effects, Gaussian Blur will give soft edges to the shadow, which makes it look more real.
- Position and Distance of the Shadow — You must invest time in setting the correct angle at which the shadow falls. In contrast, the distance can be added according to your liking.
- Simplicity is Best — Subtle, minimal shadows have wider applications than over-embellished effects.
Conclusion
Adding a drop shadow to a picture can be a game-changer for it.
You can easily add drop shadow to an image using Photoshop and Illustrator by following a few steps. Finding the natural shadow falling position can be tricky and time-consuming initially.
But with practice, you can master the skills of finding the best shadow angle. Remember to follow the professional tips to get the desired result of adding shadows.
If you have more queries, don’t hesitate to approach Meta Clipping Path for help!
Meta Clipping Path – A well-known one-stop photo editing service provider company with 5+ years of experience and 25+ highly skilled professionals.
Working with 20 reputed worldwide e-commerce companies and 200+ satisfied customers.
![Read more about the article 7 Best Drop Shadow Settings Illustrator [Add Shadows Easily in Adobe Illustrator]](https://metaclippingpath.com/wp-content/uploads/2024/08/Drop-Shadow-Settings-Illustrator-300x160.png)
![Read more about the article How to Add Shadow to Text in Photoshop in 2 Easy Methods [From Beginner Level to Pro]](https://metaclippingpath.com/wp-content/uploads/2024/08/How-to-Add-Shadow-to-Text-in-Photoshop-300x160.png)
![Read more about the article How to Add a Shadow in Photoshop in 5 Easy Steps [Create Realistic Photos like a Pro]](https://metaclippingpath.com/wp-content/uploads/2024/07/Add-a-Shadow-in-Photoshop-300x160.png)