
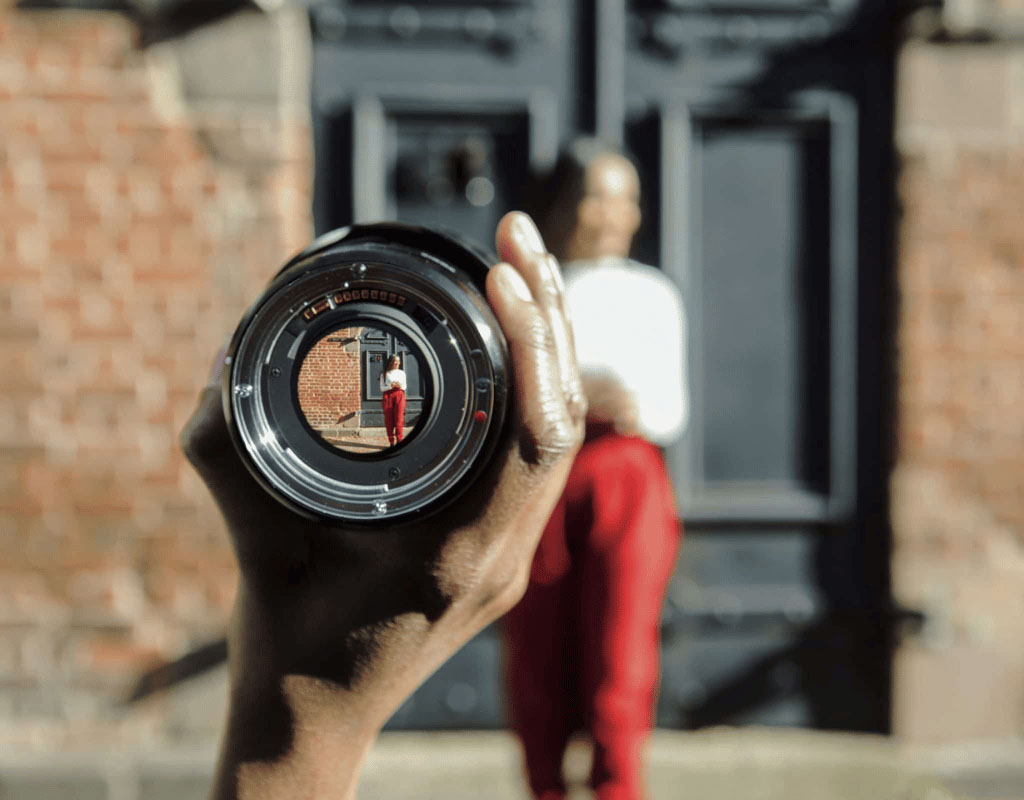
Ever come across a photo that drew your attention to the perfectly highlighted subject of the photo against a blurred background? A blurred background holds the ability to highlight the main focus of the photo and capture eyes in it.
Imagine a person standing in the middle of a street, and there are a few people, posters, lights, and trees in the background. The main focused person will be lost in the busy background in your photo.
But fading the busy background by blurring it’ll give life and whole attention to the subject.
Wondering how you can blur the background in Photoshop? Don’t worry; we’ve got your back! We’ll break down the step-by-step process of background blurring in Photoshop, common mistakes to avoid, and the lists of selection tools and blur effects you can use.
So, let’s jump into the comprehensive discussion!
Tools for Subject Cut-Out Selection in Photoshop
When you blur the background in Photoshop, you need to cut out the subject of the photo to separate the background for blurring. Here are some tools of photoshop you can use for selection:
Magic Wand
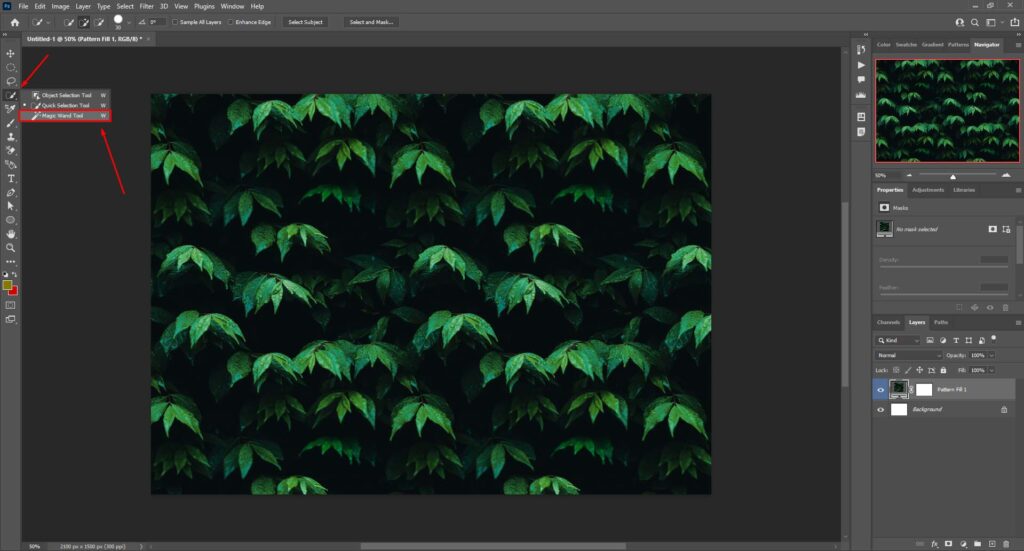
You can easily make a quick selection of large areas in a photo with the magic wand, too. It selects areas following a similar color of pixels, which makes it effortless for you to select the main subject.
However, you can set the tolerance setting to guide the tool in selecting more or fewer pixels.
Pen Tool
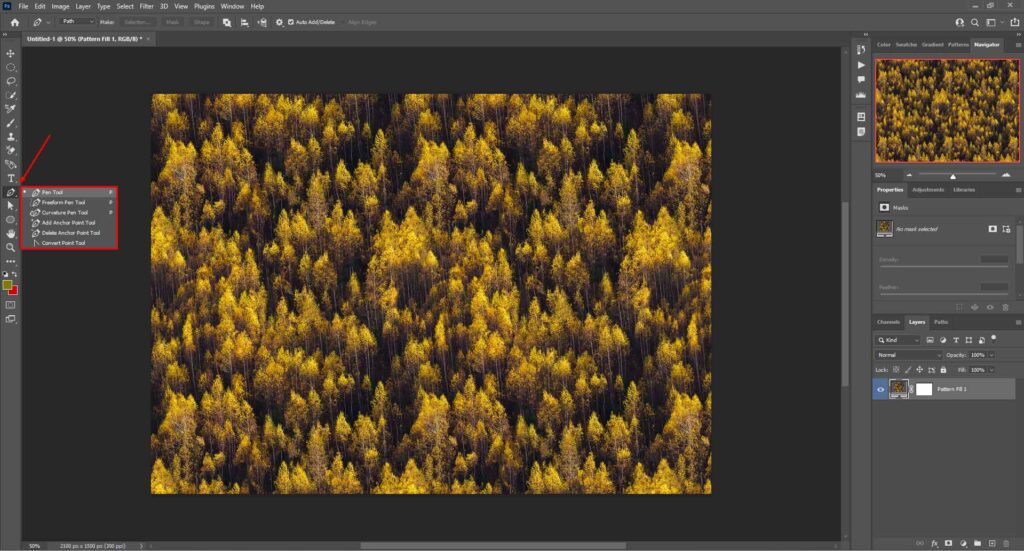
Another commonly used tool for subject cut-outs in Photoshop is the pen tool. You need to create anchor paths around the edges of the main subject of your image using the pen tool.
Remember to zoom in on the picture for accurate pixel selection. However, the path is usually straight, and you need to adjust it by dragging the handle’s length for curved edges.
After that, you need to click on “Mask Selection” and select “Copy via Layer” to get the final cut-out.
Quick Selection
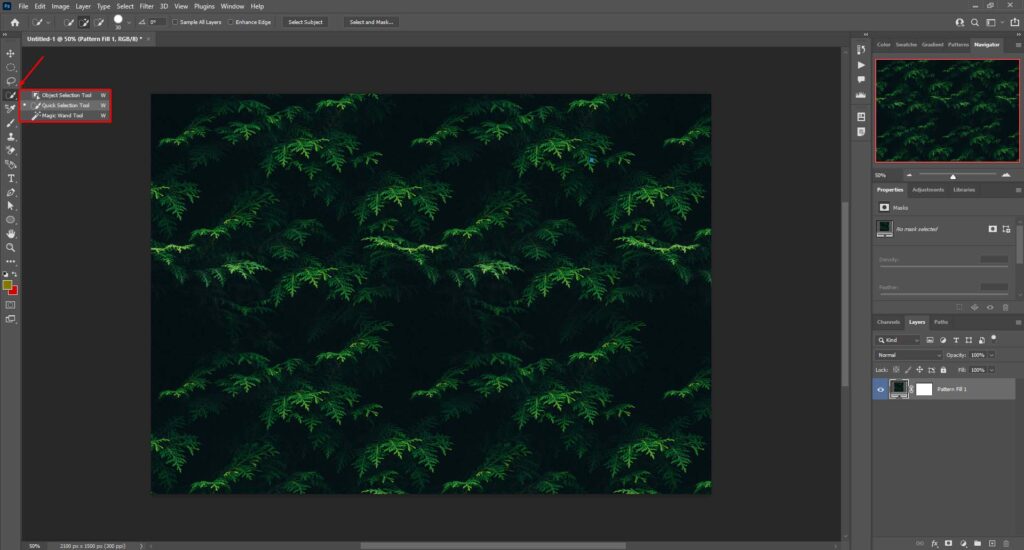
As its name implies, this tool can quickly select areas like magic wand tools. However, the magic wand tool is more targeted to colors and needs more mouse clicks.
In contrast, you can select a wide area with a quick selection tool by dragging the cursor through the picture. This tool works like a painting brush.
Lasso Tool
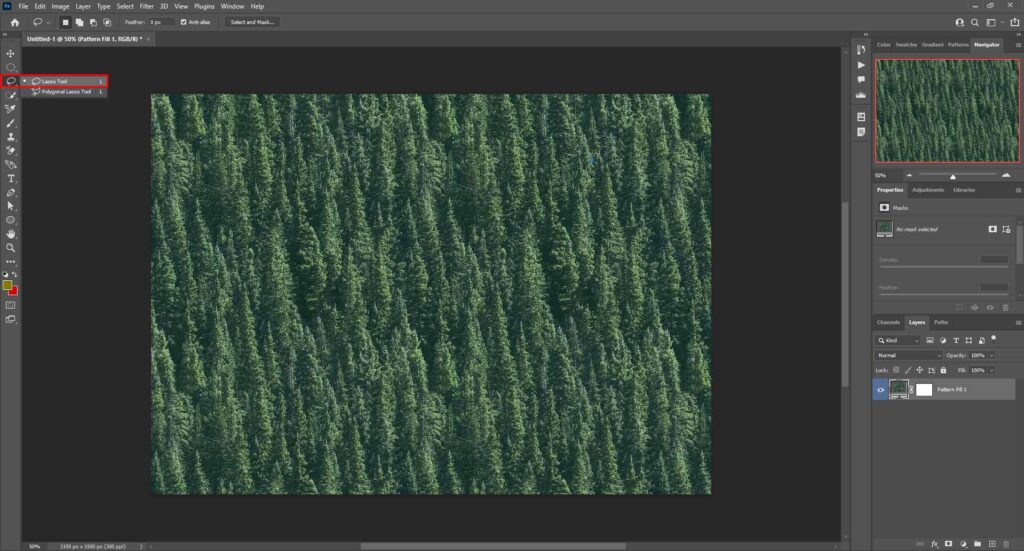
Need a tool for selecting complicated subject cut-outs? Then, you should try the lasso tool, as it works freely to make rougher selections of edges.
You have three choices for the lasso tool, and the polygonal lasso tool is often used for its precise selection to select intricate subjects.
Blurring Effects Available in Photoshop
To achieve the Photoshop blur mask in the background, you have multiple blurring options available in Photoshop. Each option offers you a different background effect.
The three most commonly used blurring options are mentioned below:
Lens Blur
Want to put a bokeh effect on your photo background? Lens blur is an effect that focuses mostly on the subject to make it stand out from the background.
Since it simulates a shallow depth of field and offers a subtle blurry effect, you can create a bokeh effect on the background. You have three options of lens blurring for different effects, such as:
- Specular highlights. It allows you to change the background brightness.
- Radius. Using this option, you can adjust the blur strength.
- Shape and Blade Curvature. If you want to modify the virtual lens, you can use this option.
Gaussian Blur
If you want a natural blur that merges all the pixels and offers a smooth blurred background, Gaussian blur in Photoshop is your go-to option.
Gaussian blur makes the edges in photos softer by blending the colors smoothly. It reduces the small details and noise of the background while keeping the overall colors and lighting.
However, you can adjust the area to blur in the “radius” setting.
Motion Blur
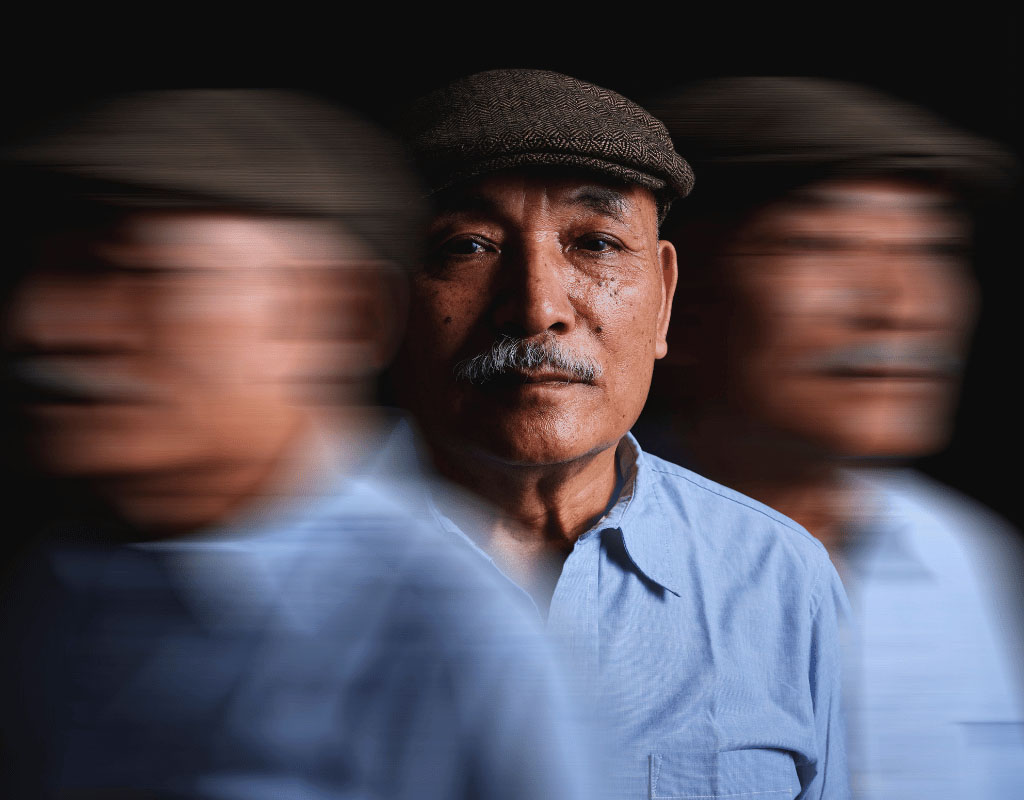
This blurring option is different from the other two. Using motion blur, you can create a visual phenomenon in your photo background.
It makes the objects in photos look blurry, as if they are moving super fast or you have taken the photo while running at high speed. However, you have to determine the direction of the object moving from left to right.
Unlike the regular blur tool, Motion Blur doesn’t just soften the edges evenly. It blends the pixels to leave a trail behind the object, just like a camera sees fast-moving light in low light.
How to Blur Background in Photoshop
Now that you have an idea about the tools and blurring effects, let’s learn how to blur a background in Photoshop through a step-by-step guide:
Step 1: Duplicate the layer
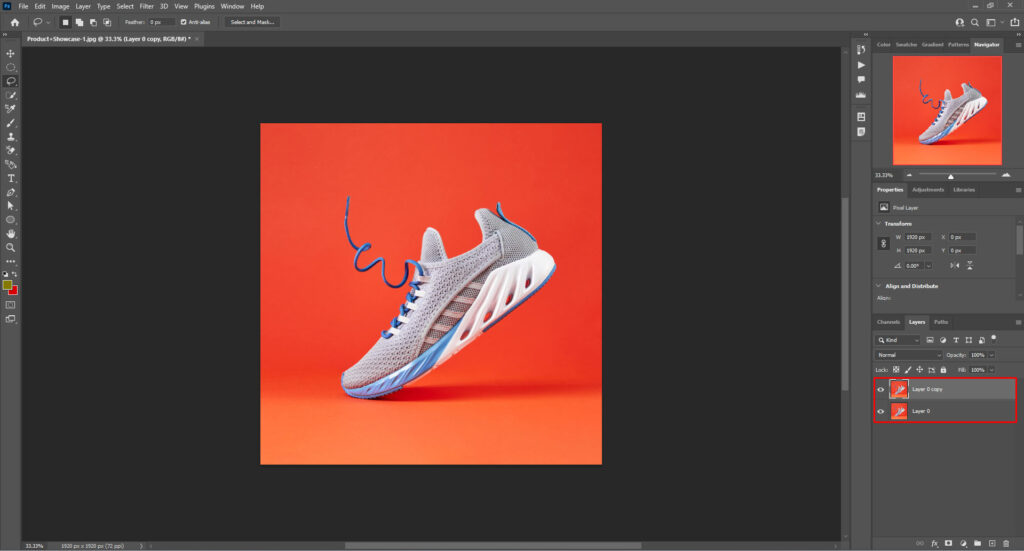
First, you need to duplicate your background layer twice; assume the first layer is your subject and the other two are the background. The keyboard shortcut for layer duplicating is Ctrl + J for Windows and Cmd + J for Mac.
Step 2: Cut Out the Main Subject
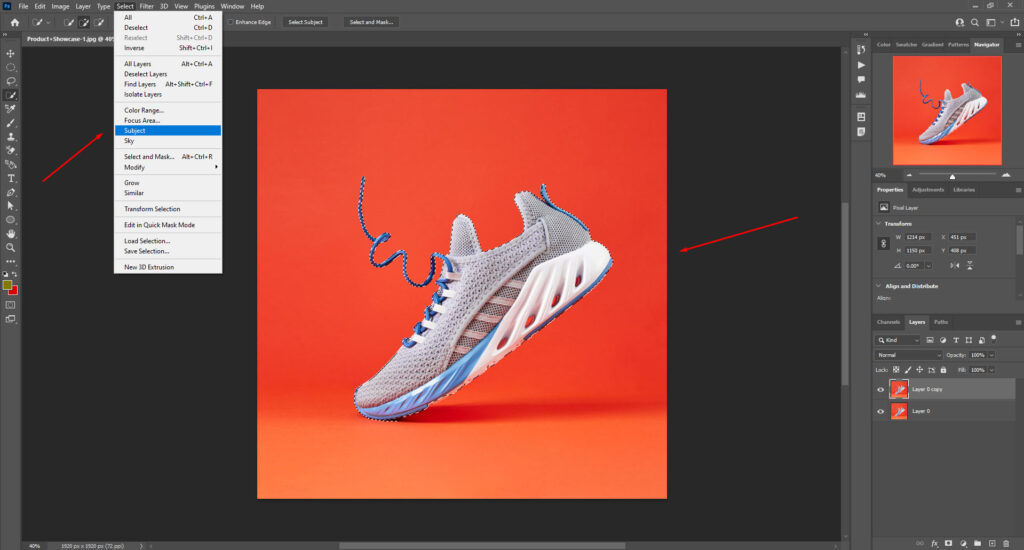
Now, select your subject layer and select a tool for cut-out. We will explain the cut-out procedure to you using the quick selection tool.
You can select the tool from the panel or simply press W on your keyboard. To make the selection process quicker, access the “option” setting in the top bar and click on “select subject” for automatic selection.
Step 3: Mask the Selected Subject
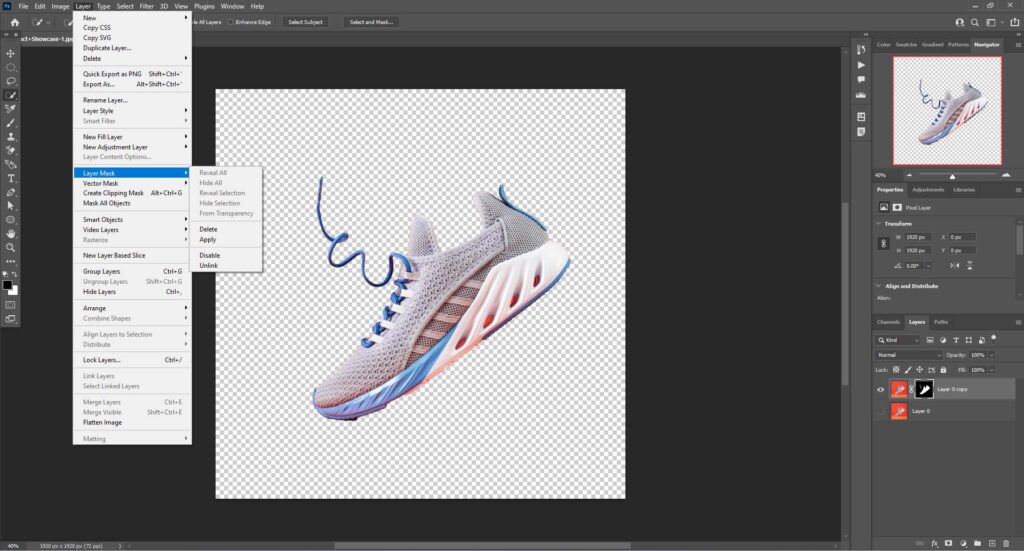
Once your main subject is selected properly, you need to mask the subject. Make sure you are on the first layer and click on the “layer mask”. If you click on the mask layer, you should see your subject cut out in a transparent background.
Step 4: Fill on Background

This step is necessary to remove the subject from the background layers. If the subject is still in the background, the color will blend with the blurred background and make it look messy.
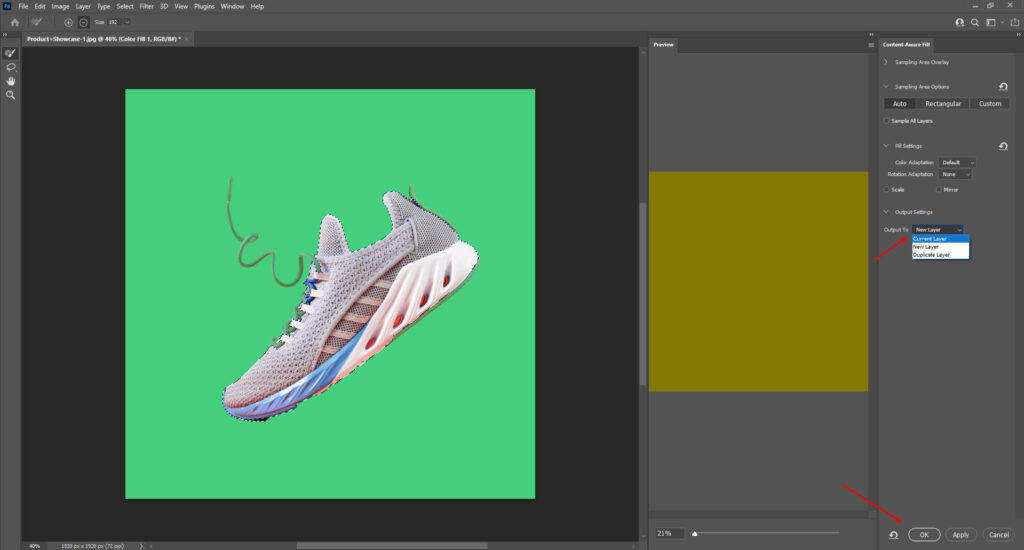
Now select the subject again in the background layer following the above method. Once the subject is selected, right-click on your mouse. Scroll through the options and click on “Content-aware fill.”
You should see the background turning green, which will work as a sample to replace the subject with the background area.
Step 5: Fix the Edges of Subject in the Background
After filling the background, you may still see some edges of the subject remaining in the background. In this case, you can expand the selection of your subject to fix this issue.
First, look at the top settings bar and set your pixel option in different resolutions, then click on expand. It will move your subject selection outward and cover the edges.
Once you fix the problem, set the output to “current layer” > press “ok” > deselect the area to complete this step.
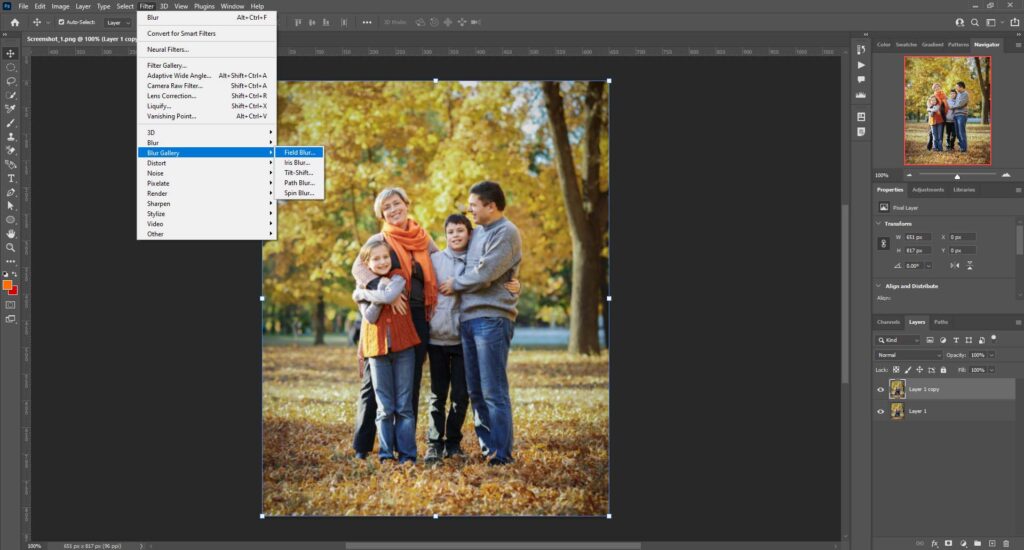
Step 6: Add Background Blur
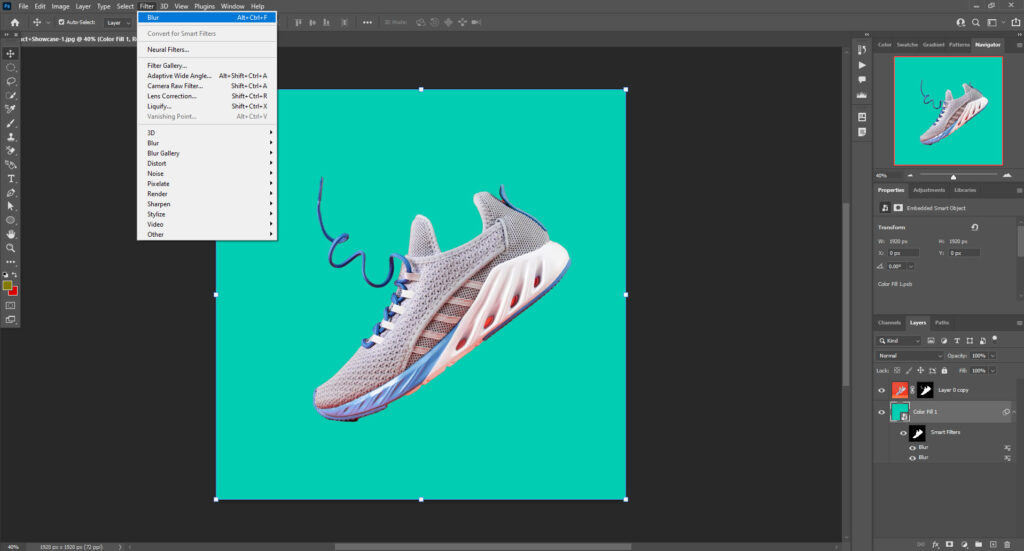
Convert the background layer into a “smart object” before adding the blur effect. Now go to the above top options bar and select “Filter,” then choose “Blur.”
You can experiment with other filter and blur options to find out which one works best for your Photoshop blur background. Make sure you’ve enabled “Preview” to see how the effects will look on your photo background.
If the subject area in your background layer needs adjustment, you can go back to the original background layer from the smart layer.
Step 7: Set the Subject and Save It
Is your main photo subject not looking perfect? Does it need a touch-up? Don’t worry—you can go to the layer mask in the first layer and fix the area that needs touch-up.
Once you’re satisfied with the final product, save the project, and your image with a blurred background is ready to use.
YouTube Video Tutorial
If you want to watch the tutorial of the step-by-step guide, you can check out the following link.
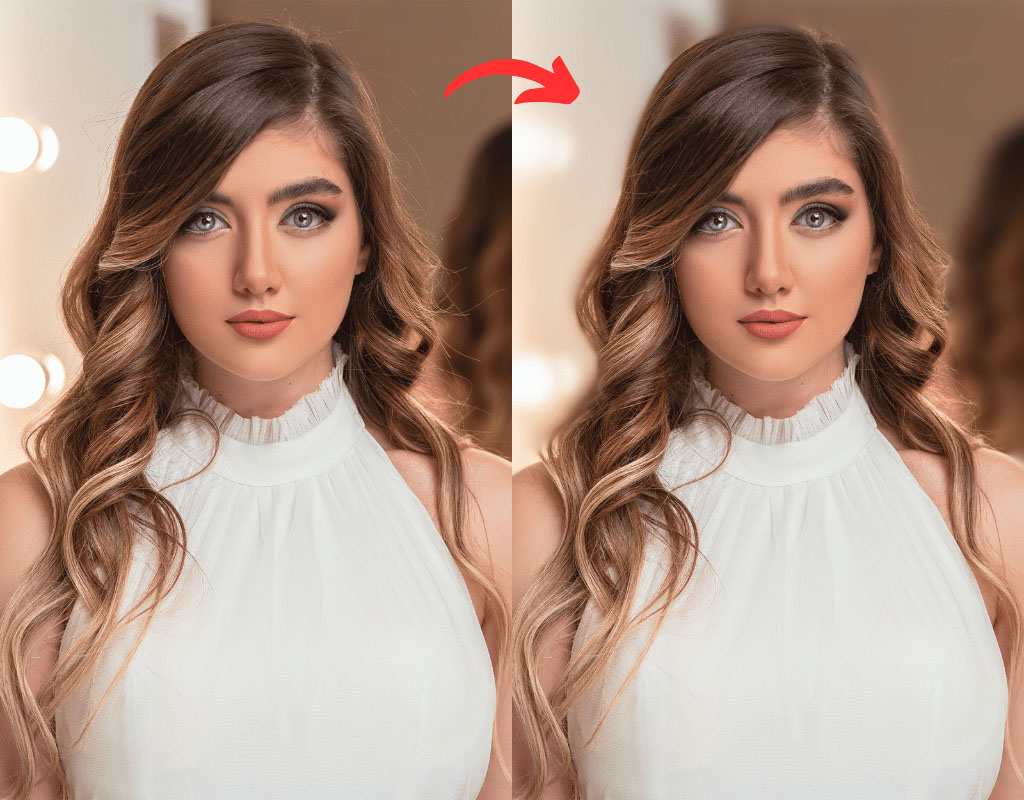
How to Blur Background in Photoshop to Add Bokeh Effect
The Bokeh effect is created by making the lights in the background out of focus. You can create this effect while taking a picture with your camera, but adding this effect in Photoshop makes it look perfect.
First, duplicate the layer, cut out the image, and fill in the background using the above method. Now follow the below steps of Photoshop on how to blur the background with the bokeh effect:
Step 1: Add Blur to the Background

Go to the first top options bar and click on “Filter.” It will give you access to the “Blur” option. You can either choose “Tilt-Shift blur” or “Field Blur” according to your preference.
Now, you need to adjust the intensity and specific location of the blur. You will see a handle on the blur tool panel; use it for adjustment. Stay in the workspace of a blur.
Step 2: Add the Bokeh Effect
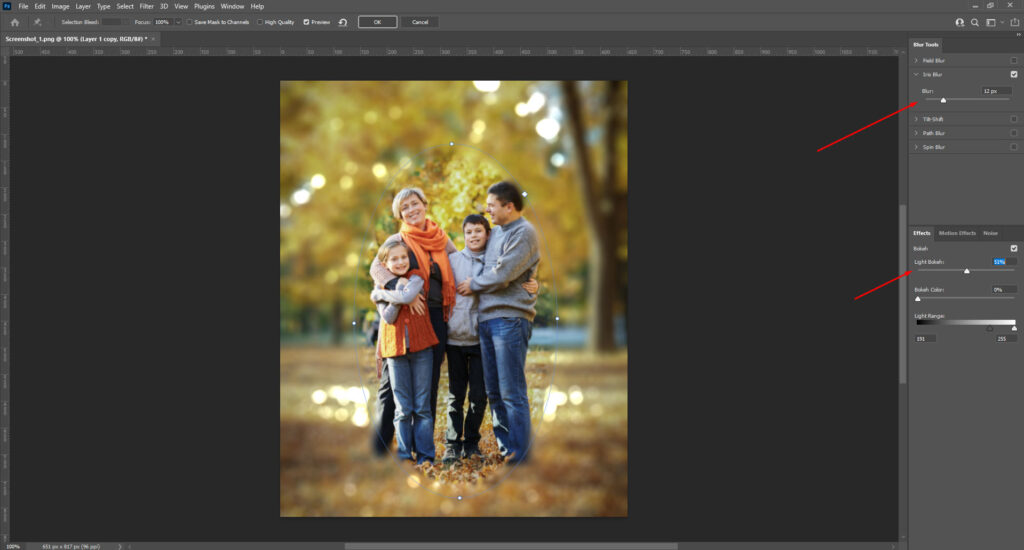
After you blur the background, it’s time to add the effect. Go to the “Effect” panel from your workspace. It should be located on your right side.
You will find a slider named “Color Bokeh” or “Light Bokeh.” Click on it, and you should see the Bokeh effect on the lights in your photo background. Save the final product.
How to Blur Background in Photoshop to Add Motion Blur Effect
You already know about motion blur from the above discussion. To add the motion blur, you need to follow the first 5 steps of blurring the background in Photoshop. Once you are done preparing the background, follow the below steps:
Step 1: Add Blur to the Background
Go to the “Filer” and select the “Blur,” then add “Motion Blur” to the background.
Step 2: Add Motion Blur Effect
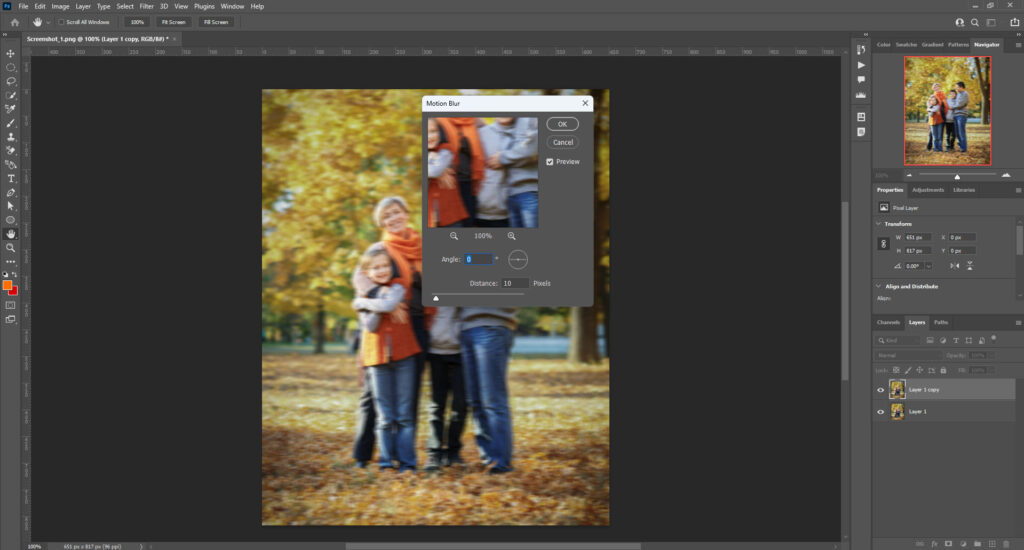
A new workspace of Motion Blur will appear on your right side. The angle-adjusting option is located there.
You can adjust the “Distance Pixels” according to your liking. As the blur effect will be applied in the smart object layer, you can adjust the distance anytime you want.
After that, you can adjust the motion blur layer and set it to where you think the motion is perfectly placed.
Here is a quick YouTube video tutorial on how to add a motion blur effect in Photoshop.
Common Mistakes of Blurring the Background in Photoshop and How to Avoid
While adding blur backgrounds in Photoshop, editors often make some common mistakes that make the whole process time-consuming and critical. Here are some common mistakes and how to avoid them for seamless work:
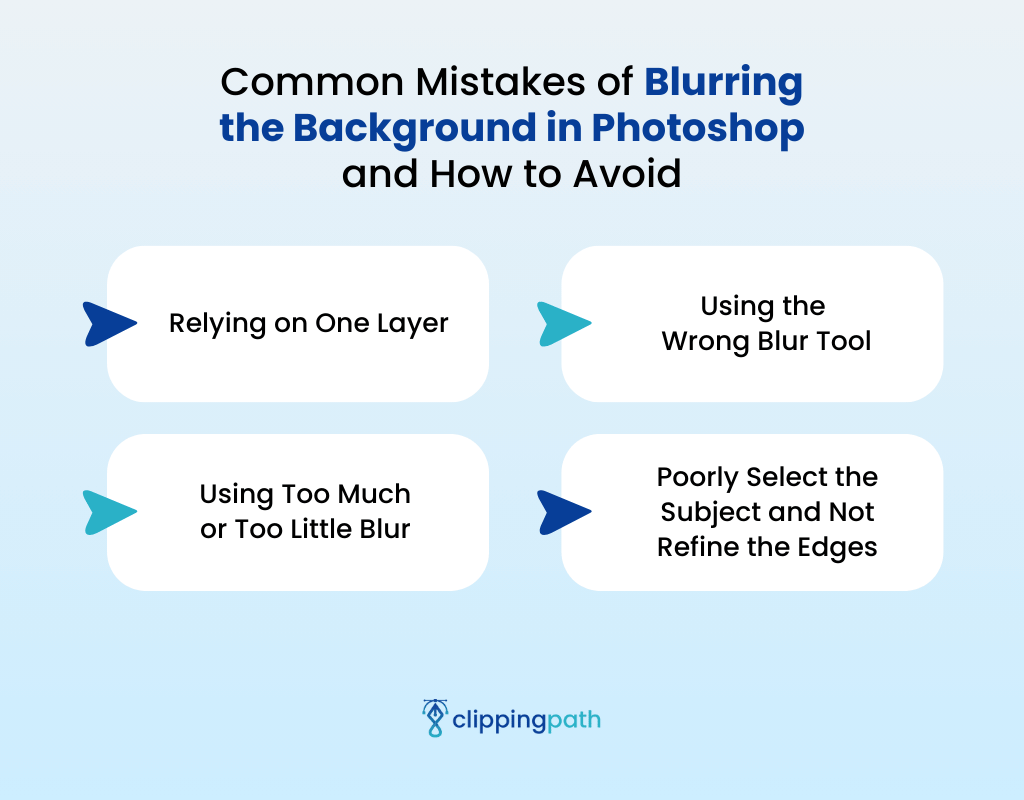
Relying on One Layer
Often, editors work on the main layer of the photo. Consequently, when they need to work on one of the objects they have worked on before, they have to undo their steps.
That’s why you need to duplicate the layer and smart object layer to simplify the working process.
Using the Wrong Blur Tool
You need to understand the blurring options and how each blur option works. For example, you can’t create a motion blur effect with Gaussian blur. You must pick the right blur tool for the desired blurring effect.
Using Too Much or Too Little Blur
Some editors add too much blurring effect to the background that it makes the photo look terribly unnatural. Again, adding too little blur will not bring out the perfect blurring effect in the photo.
Therefore, you need to understand how much blur effect is natural for your photo background. Increase blur intensity gradually and experiment with which blur intensity level looks more natural.
Poorly Select the Subject and Not Refine the Edges
This mistake is pretty common in novice editors. To attain the perfect photo with a blurring background, you also need to concentrate on the main subject of your photo.
Take your time and select the main subject with precision. Make sure you work on refining the edges of the subject for the perfect outcome.
Conclusion
So, you now know how to blur background Photoshop and the common mistakes to avoid for flawless results. While working, you need to keep in mind what you can do to prevent common mistakes from appearing.
You should have enough time in your hand to edit the background like a professional. If you rush the process, you may end up redoing all the steps.
However, don’t forget to preview your work against the original photo to understand whether your final product is perfect or needs more adjustment.
Meta Clipping Path – A well-known one-stop photo editing service provider company with 5+ years of experience and 25+ highly skilled professionals.
Working with 20 reputed worldwide e-commerce companies and 200+ satisfied customers.
![Read more about the article Background for Product Photos [The Ultimate Guide]](https://metaclippingpath.com/wp-content/uploads/2024/06/Backgrounds-for-Product-Photos-300x160.png)
![Read more about the article How to Make Background White [A Complete Guide]](https://metaclippingpath.com/wp-content/uploads/2024/07/How-to-Make-Background-White-300x160.png)