![You are currently viewing How to Create Natural Shadow in Photoshop [10 Easy Steps]](https://metaclippingpath.com/wp-content/uploads/2024/08/Create-Natural-Shadow-in-Photoshop.png)
Have you ever looked at a photo and felt like something was missing? It may be the absence of natural shadows. But how do you create natural shadows in Photoshop?
Firstly, separate your object and understand the light source. Add a shadow from the Layers Panel and start customizing. You can change the blur, color, shape, angle, and more. Refine until you reach the desired result, and repeat the process if needed.
Don’t forget to save the work! Apart from these easy steps, we also have some expert tips for natural editing. Keep reading to find out!
How to Create Natural Shadow in Photoshop: 10 Easy Steps
You may already know how to add a shadow in Photoshop. But how do you make it look natural? We’ve listed 10 easy steps for you to follow –
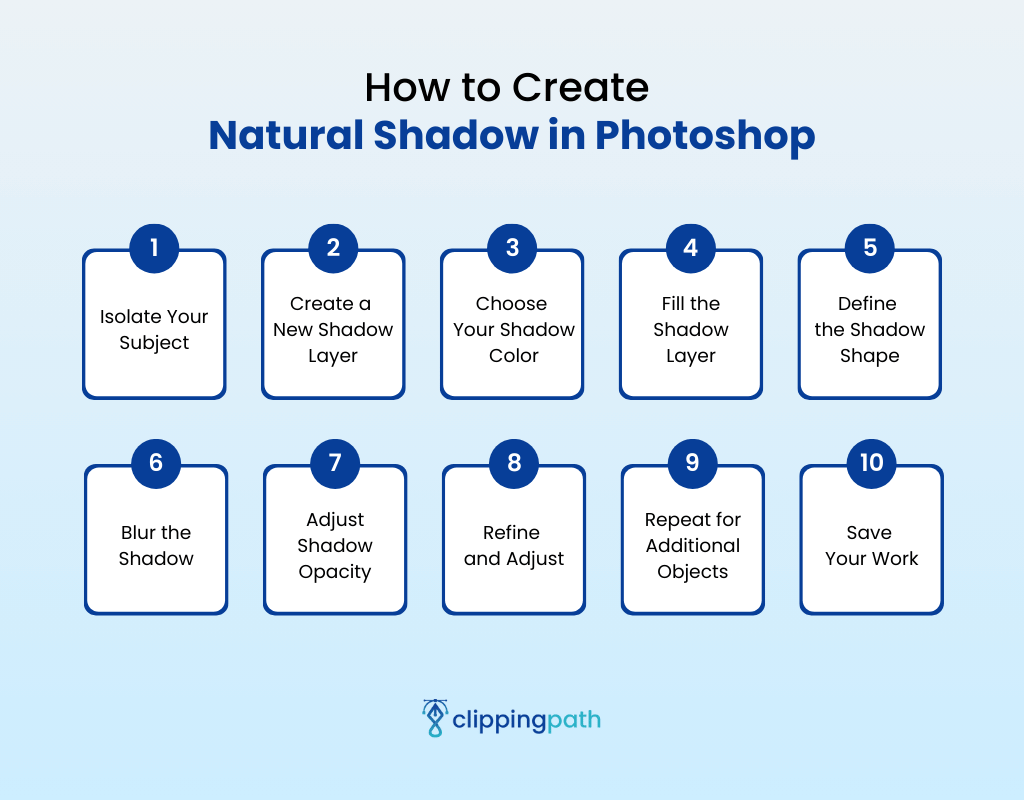
1. Isolate Your Subject
If your photo has a clear subject you want to emphasize, first isolate it from the background. This lets you focus on creating a natural shadow for the subject without the influence of background elements.
- Use the Quick Selection tool or Pen tool.
- You can also refine the background selection using tools like “Select > Refine Edge” for a more precise selection.
2. Create a New Shadow Layer
This is where you start creating the shadow. You can add shadows to texts, objects, living beings, etc. You can even draw the shadow of a person!
- Go to the Layers panel and click the “Create a new layer” icon. The icon looks like a square sheet of paper.
- Name this new layer “Shadow” for easy identification.
3. Choose Your Shadow Color
Even though most people use black for shadows, you can go for a more natural approach. Use a slightly darker version of the background color or a neutral gray. Creative shadows are now very popular in photography!
- Go to your foreground color picker. You can find it in the top square in the toolbox.
- Choose a suitable color from the options.
4. Fill the Shadow Layer
Now it’s time to fill the layer with the shadow color you’ve chosen!
- Choose the Paint Bucket tool. The icon should look like a paint can. Make sure your Shadow layer is selected too!
- Click on the canvas to fill the Shadow layer with your chosen color. This creates a solid base for your shadow.
5. Define the Shadow Shape
You have to define the shape of your shadow for an accurate representation of the object. Here’s how you can do it –
- Gently erase away parts of the shadow layer to create a feathered edge. Use a low brush hardness. This will make it look like the shadow is fading gradually as it gets further away from the object.
- Pay attention to the light source you identified earlier. Erase more heavily on the side closest to the light source. The shadow will be lighter in this area. Remember to fade out the erase towards the opposite side where the shadow is darkest!
- Shadows aren’t always perfectly uniform. So, you can add subtle variations in darkness within the shadow. This will mimic real-world light behavior.
6. Blur the Shadow
A feathered edge with the eraser tool works well. However, sometimes you might want a softer and more diffused shadow. Follow these steps –
- Select the Shadow layer and go to Filter > Blur > Gaussian Blur.
- Adjust the blur radius to achieve the desired softness. A lower blur value keeps the shadow edges more defined. If you want a softer and dreamier effect, choose a higher value.
7. Adjust Shadow Opacity
What if the shadow looks too dark or light? Here’s what you can do –
- Go back to your Shadow layer in the Layers panel.
- Change the layer’s blending mode to “Multiply”. This makes the shadow darker where it overlaps darker areas of the image. It’ll be lighter where it overlaps lighter areas.
- Reduce the layer opacity to fine-tune the darkness of the shadow. This is the percentage value next to the layer thumbnail. Aim for a subtle effect that adds depth without overpowering the image!
8. Refine and Adjust
Once you’re done with creating the shadow, it’s time to refine it! Keep customizing until you reach your goal –
- Use a layer mask for even finer control over the shadow.
- Now, add a layer mask to the Shadow layer by clicking the “Add layer mask” icon. It looks like a rectangle with a circle inside. You can find the option next to the layer in the Layers panel!
- Paint black on the mask to hide unwanted areas of the shadow. Make sure that the layer mask is selected. This will reveal the underlying photo. So, you can have pinpoint precision when refining the shadow shape!
9. Repeat for Additional Objects
If your photo has multiple objects, follow the same steps to create natural-looking shadows for each one.
Remember to adjust the light source direction and shadow placement based on the position of each object in the scene.
10. Save Your Work
Once you’re happy with the added shadows, save your work!
- Go to File > Save As and choose a suitable file format.
- You can choose JPEG for the web and PSD for further editing.
How to Add Natural Shadows Like a Pro
Now that you have the basics down, it’s time to know the expert tips! Follow these steps to take your images to the next level –
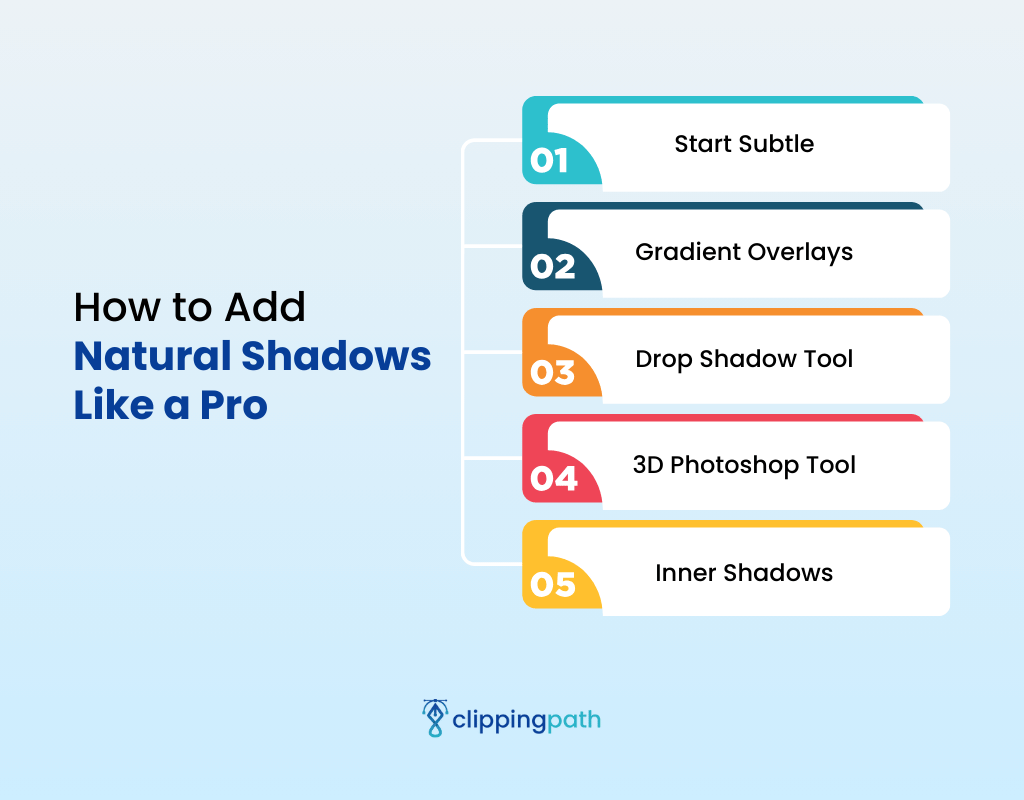
1. Start Subtle
It’s easier to add more shadow intensity later than to remove overly strong shadows.
Begin with a low opacity and gradually increase it as needed until you achieve the desired depth and realism.
2. Gradient Overlays
Even though a solid color works well for basic shadows, you can explore using gradient overlays. This gives a more natural transition.
- Create a custom black to transparent gradient.
- Apply it as a layer with a “Multiply” blend mode. This allows for a gradual shadow fade-off. Now, you can mimic the natural light behavior!
3. Drop Shadow Tool
Photoshop offers a “Drop Shadow” effect within the Layer Styles panel. Right-click on the layer and choose “Layer Style” > “Drop Shadow”.
This offers a quick way to create shadows with basic settings like opacity, blur, and distance.
4. 3D Photoshop Tool
Instead of drawing the shadow, create a 3D plane object in Photoshop.
Position and rotate it according to your light source to cast a realistic shadow on your object. This is particularly useful for creating shadows on uneven or curved surfaces.
3D lets you fine-tune shadow effects like blur, spread, and even simulate light falloff for a more natural effect!
5. Inner Shadows
Don’t forget about inner shadows! These add depth to an object. Inner shadows are useful for buttons and text with a 3D effect. You can also create a sense of hollowness!
Use the “Inner Shadow” effect within the Layer Styles panel to achieve this effect. You can watch videos on YouTube to learn how to add inner shadows in Photoshop!
Final Words
Natural shadows are important for adding depth, dimension, and realism to your photos. Wondering how to create a natural shadow in Photoshop?
Start by separating your object and creating a shadow. Then customize the shape, color, blurriness, and angle of your shadow as you like! Refine and repeat until you get the perfect result.
Never forget to save your work!
Meta Clipping Path – A well-known one-stop photo editing service provider company with 5+ years of experience and 25+ highly skilled professionals.
Working with 20 reputed worldwide e-commerce companies and 200+ satisfied customers.

![Read more about the article How to Add Shadow to Text in Photoshop in 2 Easy Methods [From Beginner Level to Pro]](https://metaclippingpath.com/wp-content/uploads/2024/08/How-to-Add-Shadow-to-Text-in-Photoshop-300x160.png)
